Assembly instructions for your extendable kitchen drawer
Installing a kitchen pull-out is easy. Just follow the simple steps in this guide to complete the installation quickly and effortlessly. In no time, your kitchen pull-out will be ready for use.
Recommended surfaces:
Glazed Stone
It’s a match! The tesa® Powerstrips keeps your ceramic tiles in one piece as it mounts your objects seamlessly to the wall.
Marble
Neither rough nor smooth stone surfaces provide a challenge for the tesa® Powerstrip.
Metal
We highly recommend metal surfaces in combination with our adhesive solution – the results are impressive!
Glass
Keep all of your glass surfaces flawlessly intact by mounting your objects to them with our adhesive solution.
Wood
There is no knocking required when using our adhesive products on wood.
Plastic: ABS, PS, Acrylic Glass
The tesa® Powerstrips technology can be applied to ABS, PS & Acrylic glass.
Not recommended surfaces:
Wallpaper
The adhesive will stick to your wallpaper until the bitter end. Unfortunately, it might separate from the wall during adhering.
Plaster
The tesa® Powerstrips securely latches onto loose plaster. Our technology is stronger than the surface and might tear it off the wall.
Cement
The tesa® Powerstrips securely latches onto loose cement. Our technology is stronger than the surface and might tear it off the wall.
Stone
The stone's surface might not be even or stable enough to provide strong hold.
Plastic: PE, PTFE & PP
The combination between the tesa® Powerstrip and polyethylene (PE), polypropylene (PP) and polytetrafluorethylene (PTFE) will not form a stable compound and won´t hold.
Enamel Varnish
The varnish might not be stable enough to keep stuck on the wall once our glue is applied.
How to organize your kitchen in just a few steps:
01Clean the surface
To ensure that the adhesive solutions hold firmly and reliably later on, the surface must first be cleaned. Make sure that you thoroughly remove any dust, grease residue and dirt. To do this, you can use a cloth with a silicone-free grease remover or alternatively use pure alcohol. Dirt and grease from cooking can quickly accumulate in the kitchen in particular, so you should clean this area especially thoroughly.
02Turn the assembly and stick on the strips
Once you prepared the assembly, turn the assembly over so that it lies with the mounting plates facing downwards. Stick all individual strips onto the glossy surfaces provided. Take care not to touch the adhesive surface. Caution! Leave the protective film on the strips.
03Secure the front spacer clip
Secure the assembly by hand so that it does not move. First fold the front spacer clip upwards. Remove the protective film and then fold it down with the strip. Repeat the sequence of the previous step for the rear spacer clip
04Press on the spacer clips
Press firmly on the spacer clips with your fingers. Remove the positioning aid.
05Remove the protective film
Now fold the assembly upwards and remove the protective films from the remaining strips.
06Glue on the mounting plates
Fold the assembly down and press the mounting plates firmly into place. For hits you can use the pressing tool. Push the pressing tool 10 times up where indicated to ensure optimal hold. When used correctly, the pressing tool ensures that the adhesive is pressed down evenly and firmly, providing a secure hold.
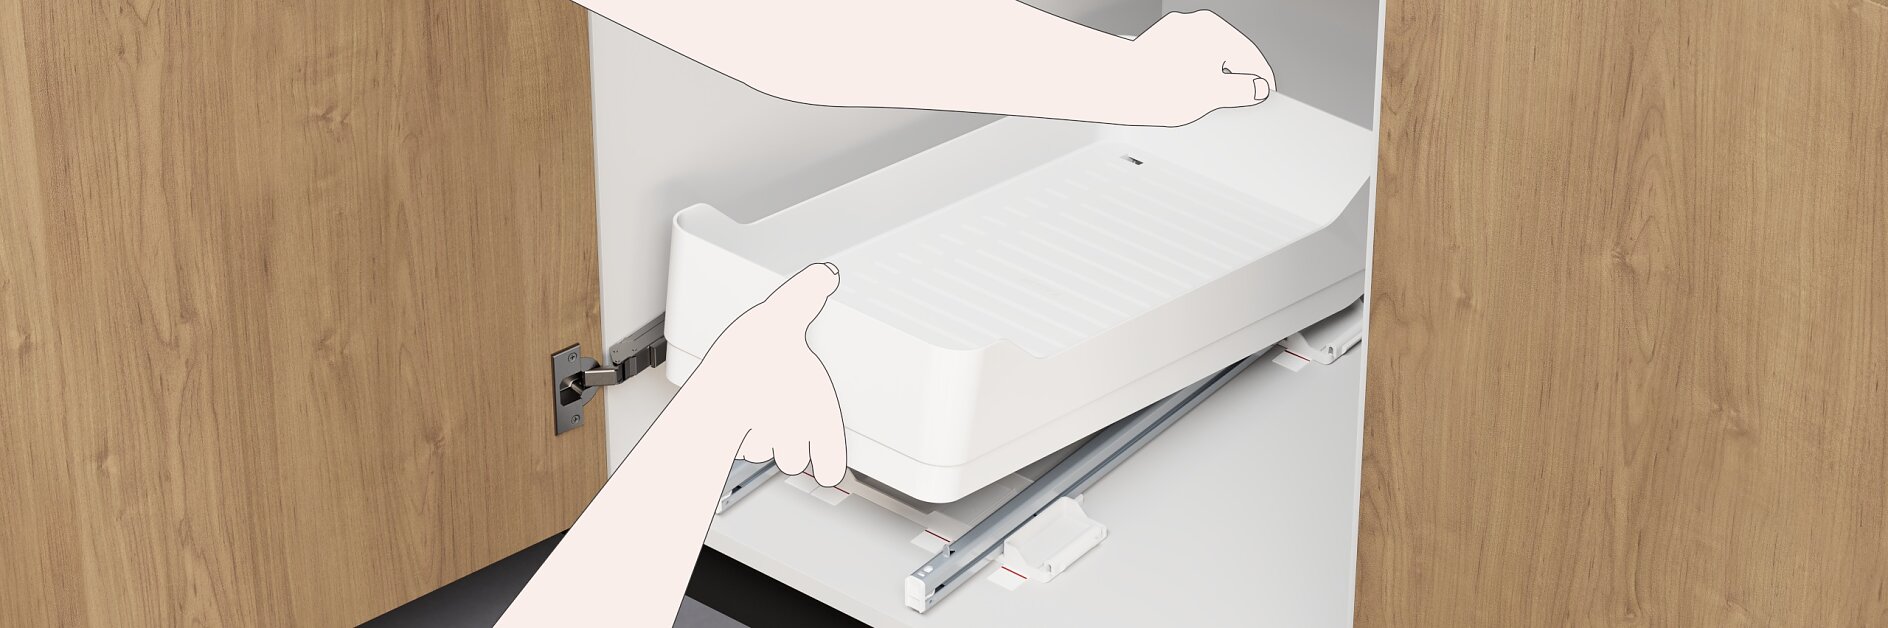
07Engage the shelf
Place the shelf on the pull-out rails and press firmly until it ‘clicks’. Make sure that the pull-out shelf is fully retracted. Assembly of the pull-out is now complete. It can now be filled with the desired contents
How to remove your kitchen organizer:
01Remove the strips
Hold the mounting plate by the side without pressing it against the base of the cupboard. Grasp the strip by the handle and slowly pull it forwards parallel to the base of the cabinet until it comes loose. Remove the assembly from the cabinet as soon as both mounting plates have been released.
02Finish!
Voila! Your kitchen cabinets are as clean as before and not damaged.
Looking for spare Powerstrips? This is what you need...
tesa® Powerstrips Refill for telescopic Bottom- and Side Pull-Out
tesa® Powerstrips® Refill Set makes it easy to reuse and reattach tesa® Pull Out bottom and side pull-outs. The Powerstrips® can be attached without the need for drilling and removed again without leaving any residue or damage.
Long-lasting: The kitchen organiser refill set allows the base and side pull-out to be reused
More flexibility: Suitable for installing in a new kitchen or repositioning in the home
Easy fastening: Can be attached without drilling or extra tools - quick installation