Recommended surfaces:


Not recommended surfaces:


Easy attachment and removal in 8 steps
Note: Please be sure to also look at the assembly instructions, which can be found in the respective product packaging. In individual cases, there may be slight differences in the assembly.
EASY-ON - How to mount your bath design:

01Clean the surface very thoroughly
Once you have found the right place for mounting, you should clean this area intensively. The waterproof Powerstrips® will only achieve their maximum holding power on surfaces that are free of dust, grease, lime and dry.
Therefore, first clean the surfaces with a damp, clean cloth before application. Please do not use any non-stick cleaning agents or cleaners containing silicone, as these substances impair the adhesive effect. Then use the enclosed primer cloth and wipe the surface very thoroughly with it.
If you want to "play it safe", wipe the area again with a dry, soft and clean cloth.

02Select Powerstrips®
Take Powerstrip® from paper sheet. Make sure that you only touch the Powerstrip® at the marked grip areas. This is often below the red or blue marked line. Be careful not to touch the Powerstrip® on its sticky side.

03Attach the Powerstrips®
Stick the Powerstrips® in the designated places on the bathroom accessory you want to mount on the wall, so that the blue, peelable side is facing up. Make sure that you press firmly on the adhesive strips for five seconds so that they can develop their full holding power.

04Remove protective film
Now remove the blue protective film and press your bathroom accessory with the waterproof Powerstrips® to the place where you want to attach it.
Info: Do not touch already open adhesive surfaces with your fingers. Otherwise, new grease could get onto the surface and reduce the load-bearing capacity.

05Stick your bathroom accessory on the wall
To guarantee the best hold, the tesa® Powerstrips Waterproof XL must be properly attached to the wall.

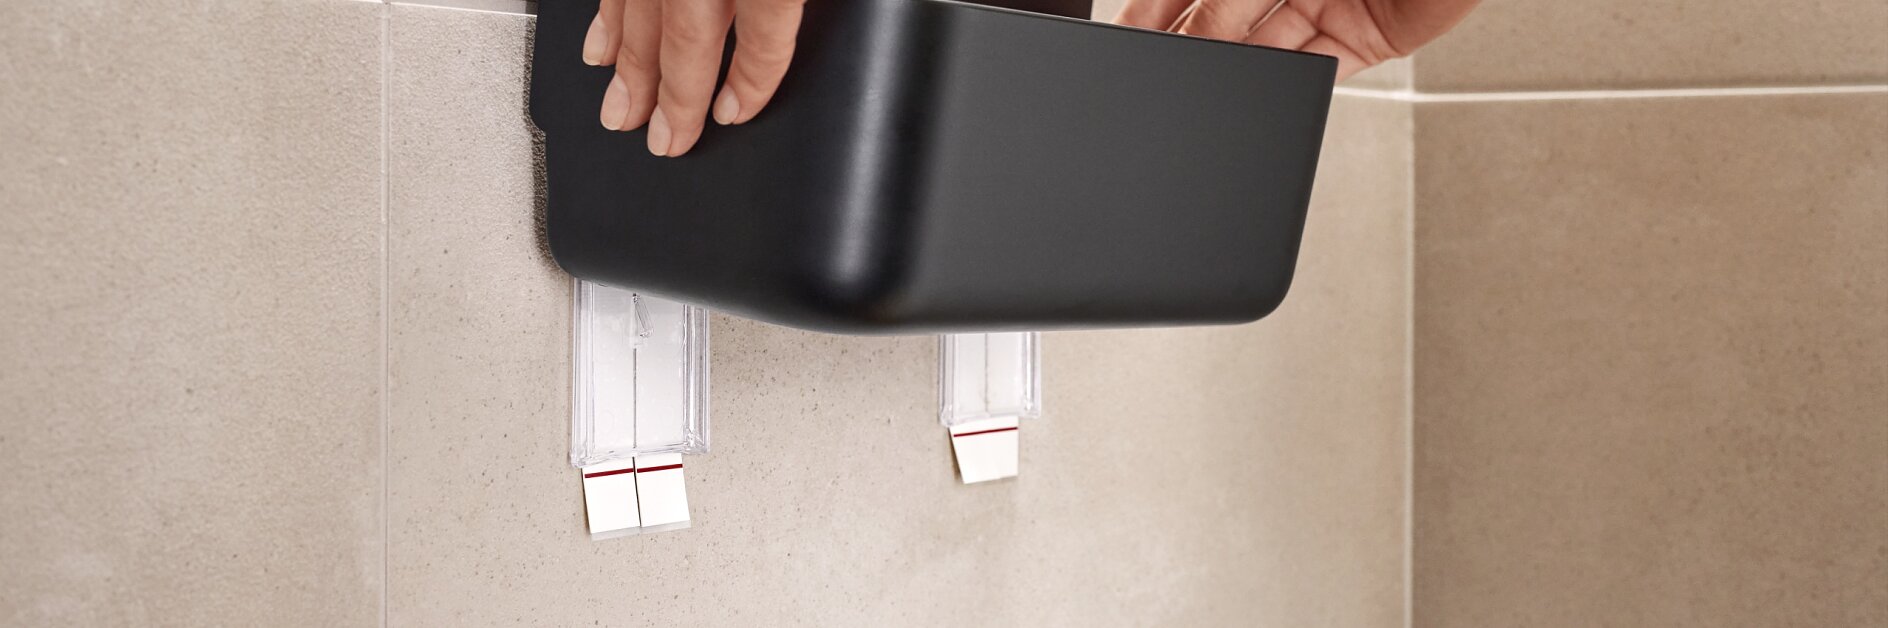
06Remove the accessory
Simply remove your bathroom accessory from the tesa® Lavaa or tesa® Baboo series from the wall without removing the Powerstrips® by pulling it parallel to the surface.

07Press Powerstrip and holding adapter
In the next step, press the adhesive strips firmly to the surface for five seconds.

08Final move
Now you can slide your bathroom accessory back over the powerstrips® and use your product as usual with full hold - no drilling required.
EASY-OFF - How to remove everything:

01Remove the accessory
Removing the Powerstrips® is just as easy as installing them! Pull off your bathroom accessory parallel to the substrate so that you only see the adhesive strips in front of you.

02Remove the Powerstrips®
These can be removed again without leaving any residue. To do this, simply pull off the Powerstrip® slowly, parallel to the surface. Whilst doing that, hold the transparent adpater plate tight.

03No residue - Perfect result
Voila! Your surface is as clean as it was before. You can reuse transparent adapter plate and the bath accessorie itself. You simply can purchase a Powerstrips Waterproofed XL refill pack.
Pictures are boring? Watch our video tutorial instead...
This video tutorial is applicable to all bath accessories that are mounted with our Powerstrips® technology.

FAQ's about the tesa Powerstrips® Technology:
What do I have to take into consideration before removing the Powerstrips®?
Objects that are fixed with tesa Powerstrips® can be removed without a trace. In order to do so, the non-adhesive tab (end) of the Powerstrip has to be pulled down slowly and parallel to the surface, until the adhesive bond separates. Avoid putting any pressure on the die-cut or the object during removal. Attached objects (e.g. bathroom storage or picture frames) should be secured in order prevent them from falling. Temperatures below 15 °C will restrict the removal process considerably.
Where can I buy tesa Powerstrips®?
Find your online shop or retailer in our Where to buy (opens in a new window or tab) section.
Can I use tesa Powerstrips® in cold climates?
The optimal temperature for application is: 20 - 25 °C (min. 15 °C). After applying, tesa Powerstrips® will be permanently temperature-resistant up to 35 °C and temporarily up to max. 40 °C. Temperatures above the recommended handling temperature will lower the holding power. However, lower temperatures after applying will not be a problem. Please note that tesa Powerstrips® are recommended for indoor use only.
Do tesa Powerstrips® contain any toxic or acid materials?
The adhesive used in tesa Powerstrips® contains no toxic materials. It is made of synthetic rubber.
Which surfaces can I apply tesa Powerstrips® to?
This varies by product. You can use tesa Powerstrips® Large, tesa Powerstrips® Small, tesa Powerstrips® Transparent Large, or tesa Powerstrips® Transparent Deco on tiles, glass, wood and most plastics. Ideally the surface should be smooth, flat and solid. tesa Powerstrips® Poster can be fixed to glass, wood, most synthetic materials (including plastic) and even sensitive surfaces like wallpaper or varnished surfaces. tesa Powerstrips® Waterproof Strips are suitable for tiles and glass but not all synthetic materials (plastic) or marble. If you want to apply this waterproof tape to a synthetic material, test it first on an unobtrusive area.
What is the best way to remove tesa Powerstrips®?
Objects that have been fixed with tesa Powerstrips® can be removed without a trace. In order to do so, pull the non-adhesive tab (end) of the Powerstrips® down slowly and parallel to the surface, until the adhesive bond separates. Avoid a lot of pressure on the die-cut or object during removal. Attached objects should be secured while removing in order to prevent them from falling. Temperatures below 15 °C will restrict the removal process considerably.
What is the best way to clean the surface before I use tesa Powerstrips®?
To apply tesa Powerstrips® Transparent adhesive strips (Large), tesa Powerstrips® Transparent Deco, tesa Powerstrips® Large or tesa Powerstrips® Small removable adhesive strips clean the surface with a silicone-free window cleaner, methylated spirit or isopropanol. Bathroom or general-purpose cleaning agents are generally not suitable.
If you’re using tesa Powerstrips® Poster removable adhesive strips on wallpaper or plaster, clean the surface with a lint-free cloth. If using them on tiles or glass clean the surface with a window cleaner (without silicone), methylated spirit or isopropyl alcohol. Bathroom or general-purpose cleaning agents are generally not suitable.
When applying tesa Powerstrips® Waterproof adhesive strips clean the surface with a silicone-free window cleaner, methylated spirit or isopropanol. Bathroom or general-purpose cleaning agents are generally not suitable. Please note, the primer tissue supplied with the waterproof tape is not a cleanser but a device for preparing the surface for a waterproofed bonding.
How do I apply tesa Powerstrips®?
To apply tesa Powerstrips® Transparent adhesive strips or tesa Powerstrips® Large or tesa Powerstrips® Small removable adhesive strips the surface must be sufficiently solid, dry, clean and free from grease. Use a silicone-free window cleaner, methylated spirit or isopropyl alcohol as a cleansing agent. Bathroom or general-purpose cleaners are generally not suitable. Let the surface dry. Remove one protective cover sheet and place the Powerstrip on the object. Press down firmly for five seconds. Make sure the tab can be accessed for removal. Do not remove the clear foil strip from the end of the tab. Remove the other cover sheet and press the object onto the surface. Press firmly for five seconds.
To apply tesa Powerstrips® Poster removable adhesive strips the surface must be sufficiently solid, dry, clean and free from grease. Peel the Powerstrip from its protective cover sheet and place it onto the object. Press firmly for five seconds. Remove the other cover sheet and fix the object onto the surface. Press firmly for five seconds again.
To apply tesa Powerstrips® Waterproof adhesive strips the surface must be sufficiently solid, dry, clean and free from grease. Use a silicone-free window cleaner, methylated spirit or isopropyl alcohol as a cleansing agent. Bathroom or general-purpose cleaners are generally not suitable. Let the surface dry. Open one sachet, take out the primer tissue and wipe over the surface. Let it dry. Remove one protective cover sheet and place the tesa Powerstrip on the object. Press firmly for five seconds. Make sure the tab can be accessed for removal. Do not remove clear foil strip from end of tab. Take off the other cover sheet and press the object onto the surface. Press firmly for five seconds.
Visit our How to Use (opens in a new window or tab) page for a step-by-step visual guide.
Can tesa Powerstrips® Transparent be damaged by UV radiation?
Generally no, the adhesive bonding itself is not affected by the UV conditions. However, very high UV exposure might negatively affect the removability of the die-cuts. The UV resistance of Powerstrips® transparent depends on the levels of UV radiation, UV intensity and UV exposure time.
Does the weight listed on the package increase with the number of tesa Powerstrips® used?
The holding power does improve but not linearly.
Last updated on Apr 22, 2025