Assembly instructions for your kitchen organization
Did you know that you can organize and tidy your kitchen without much effort? With our flexible and individual kitchen organization system, you can easily tidy up and neatly structure the various kitchen utensils and accessories. The kitchen railing system can be used to attach herb pots, kitchen roll holders, cooking utensil or washing-up utensil holders, storage boxes, shelves or a magnetic knife block. With additional individual hanging options, your kitchen utensils have a fixed place and are always ready to hand. The various tools for your kitchen organization can be attached quickly and easily without drilling or tools.
Recommended surfaces:
Cement
Your solid decoration ideas are going to hold on safely to any concrete surface.
Glass
Keep all of your glass surfaces flawlessly intact by mounting your objects to them with our adhesive solution.
Wood
There is no knocking required when using our adhesive products on wood.
Stone
The SMP-Glue likes to explore all nooks and crannies of these surfaces, holding on effortlessly with its strong grip.
Marble
Neither marble nor smooth stone surfaces provide a challenge for the tesa® Power.Kit Technology.
Plastic: ABS, PS, Acrylic Glass
The tesa® Power.Kit Technology can be applied to ABS, PS & Acrylic glass.
Metal
We highly recommend metal surfaces in combination with our adhesive solution – the results are impressive!
Glazed Stone
It’s a match! The tesa® Power.Kit keeps your ceramic tiles in one piece as it mounts your objects seamlessly to the wall.
Not recommended surfaces:
Wallpaper
The adhesive will stick to your wallpaper until the bitter end. Unfortunately, it might separate from the wall during adhering.
Plaster
The tesa® Power.Kit securely latches onto loose plaster. Our technology is stronger than the surface and might tear it off the wall.
Enamel Varnish
The varnish might not be stable enough to keep stuck on the wall once our glue is applied.
Plastic: PE, PTFE & PP
The combination between the tesa® Power.Kit Glue and polyethylene (PE), polypropylene (PP) and polytetrafluorethylene (PTFE) will not form a stable compound and won´t hold.
How to organize your kitchen in just a few steps:
01Clean the surface
To ensure that the adhesive solutions hold firmly and reliably later on, the wall behind your worktop must first be cleaned. Make sure that you thoroughly remove any dust, grease residue and dirt. To do this, you can use a cloth with a silicone-free grease remover or alternatively use pure alcohol. Dirt and grease from cooking can quickly accumulate in the kitchen in particular, so you should clean this area especially thoroughly.
02Add the adapter
Now you can attach the adhesive screws to the railing (or adapter) using the knurled nuts provided.
03Remove the protective film
In the next step, you can stick the adhesive screws to the wall using the railing or adapter. To do this, remove the protective film from the adhesive screws. Note that the adhesive screws can no longer be moved once you have stuck them on - the adhesive screw adheres on its own.
04Find the perfect spot
Place the enclosed spirit level on top and hold the kitchen railing or adapter against the wall behind the worktop. Decide which position you like best for your new kitchen organization. Align everything straight and make sure you don't stick it over joints. Use the slotted holes to align the adhesive screws accordingly. Once you have found the perfect position press the railing system and the adapter lightly. You don't need to apply a lot of force. Now unscrew the railing or adapter again so that you only have the adhesive screws on the wall.
05Press in the adhesive
To ensure that your kitchen railing or adapters adhere firmly and reliably to the wall later, you now need the adhesive supplied. You can press the adhesive into the larger of the two holes in the adhesive screw. You need just enough adhesive until the mass emerges from the smaller hole. Be careful not to press too hard and slowly. The adhesive needs some time to spread under the adhesive screw. Repeat this step for all the adhesive screws you want to attach.
06Allow the adhesive to dry out
The adhesive now needs to dry so that it can develop its full adhesive strength. This drying process takes around 12 hours. The adhesive screws must not be loaded before the adhesive is completely dry.
07Fitting the kitchen railing or adapter
Once you have allowed the adhesive screws to dry out, you can fit the railing or adapter. Simply slide the kitchen railing or adapter onto the adhesive screws and secure it with the knurled nuts provided.
How to remove your kitchen organizer:
01Remove the items
The disassembly of the adhesive adapter is as easy as the assembly! First remove all items until onl ythe adapter is left.
Now grasp the adapter with a pipe wrench and simply turn it clockwise carefully from the wall.
02Remove adhesive residue easily
If adhesive residue remains on the surface, you can gently scrape it off with a thin spatula or scraper.
03Finish!
Voila! Your tiles are as clean as before and not damaged.
Pictures are boring? Check out our video tutorial...
Application Video for tesa Rail-System & Single Adapters
Looking for a spare adhesive adapter? This is what you need...
This is how it works:
Adapter
This is the main element, the adapter. Once this is mounted, you can simply attach your kitchen organization product onto this adapter. It works the same way, as the bigger rail.
Adhesive Screw
The adhesive screw consists of a sinter-metal-plate (SMT) with 95% cooper, the rest being made of tin and wax. The SMT plate is permeable for air allowing shorter curing time. Furthermore the adhesive ring provides a border for the glue for easy pre-fixation.
Nut
By using a nut you can fix the fail or single adapter onto the adhesive screw.
Cover
This cover plates hides the screw and nut and makes your kitchen products look amazing.
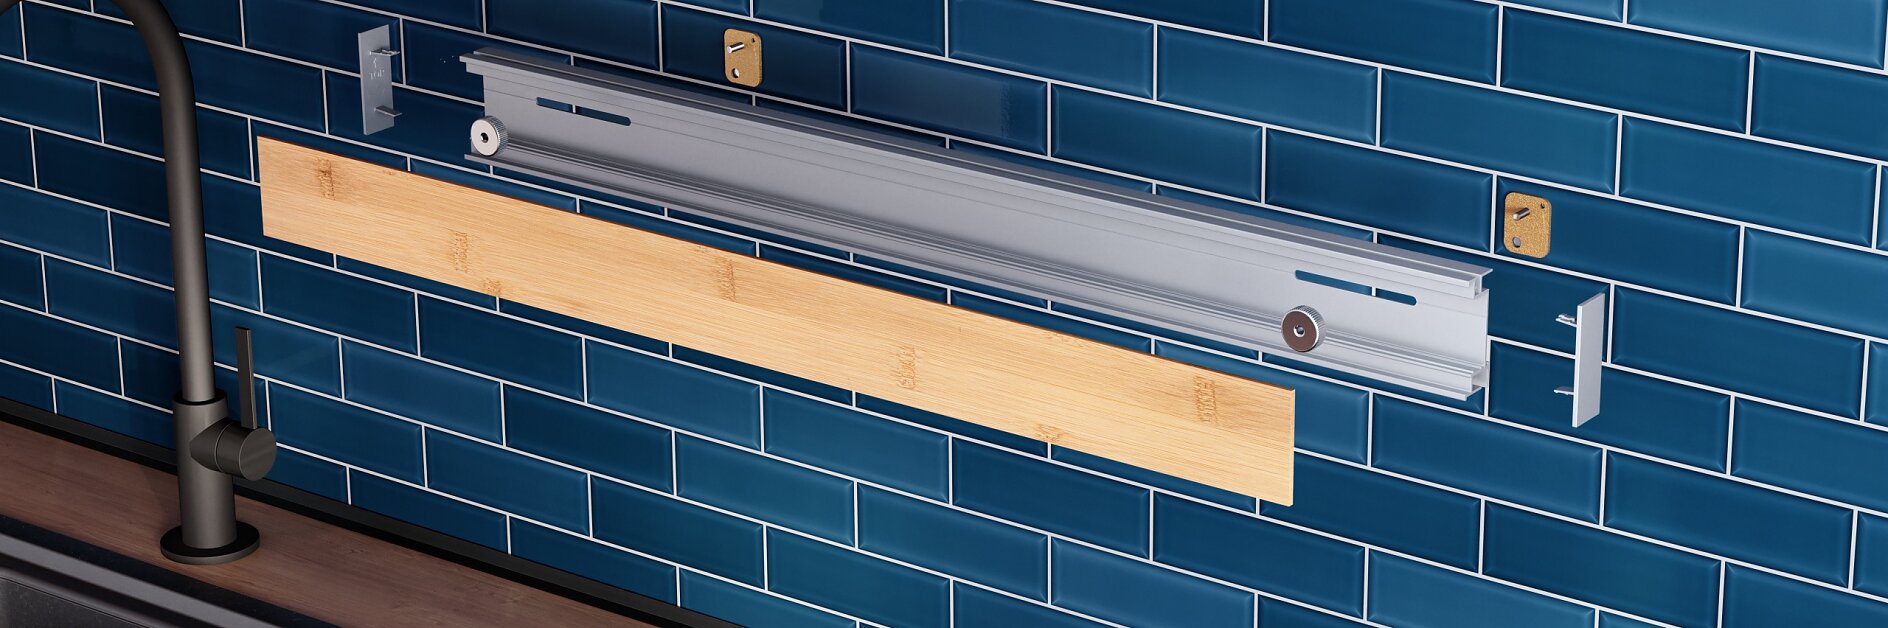
Rail-System
The rail is the main element. You can simply attach/hang every kitchen organizsation item onto it. You can fleixble change it and swop item's places.
Nuts
By using a nut you can fix the fail or single adapter onto the adhesive screw.
Adhesive Screw
The adhesive screw consists of a sinter-metal-plate (SMT) with 95% cooper, the rest being made of tin and wax. The SMT plate is permeable for air allowing shorter curing time. Furthermore the adhesive ring provides a border for the glue for easy pre-fixation.
Cover
Before placing the storage items, you place the cover that hides the screw and nut and makes your kitchen products look amazing.
The best things is: You can choose between two styles. The cover has two sides. One is white and the other one looks like a fine piece of wood.
FAQ's and answers about mounting our kitchen organizer without drilling:
Can I mount the tesa® kitchen organizer without drilling?
Yes, you can mount our kitchen railing and our adapters for an organized and structured kitchen completely without drilling. With our practical adhesive screws, you can simply stick on your kitchen organization system.
Will the no-drill kitchen organizer hold my kitchen utensils?
Yes, the special adhesive screws and the adhesive solution are designed for a weight of up to 3 kg. This means that your kitchen organization system adheres firmly and reliably to the wall. Make sure to clean the surface thoroughly before mounting. Otherwise, grease and dirt can impair the adhesive strength.
Can I reuse the kitchen organization system?
Yes, you can quickly and easily dismantle your kitchen organizer and reattach it in your new home. All you need are new adhesive screws.