To make sure that the painting results are perfect, you should first answer a few questions. Because a good preparation is already half the success.
Wall Paint: A Creative Talent
Technologies
Customized wall design is easier than you think and with a few tricks, your home turns into a stage for a large work of art.
Text
1. Before you start
2. Choosing the right wall paint
Which surface would I like to paint?
Wallpaper, wood, stone, etc.
Do I need a primer?
A wall primer reduces, for example, the absorbency of the surface.
What requirements must the paint meet?
For example, water or abrasion resistance.
How well must the paint cover?
Cheap paints often result in a stained effect.
Is anybody in your family allergic to certain components?
If you have small children, you should pay attention and use paints without plasticizers and solvents.
3. Selecting the right equipment
- The right adhesive tape for my application.
- Brush and paint roller (with telescope extension).
- Paint tray and scraper.
- Ladder and protection for clothes and furniture.
4. Tips & tricks for painting
- The surface must be clean, dry, and dust-free. (Otherwise, the masking tape nor the paint will hold properly.)
- Remove lamps and sockets before masking.
- Carefully and evenly press the masking tape to the surface.
- Ensure an even distribution of the paint.
- Remove the masking tape before the paint is completely dry!
- Pull the tape off the wall at a 45° angle – it’s gentler on the surface.
Perfect color edges
To give your personal wall decoration a pefect frame, sharp edges without color bleeding – thats´s what you call nasty jagges paint edges that occur when the tape is not appled tight enough on the wall – are a must.
Perfect color edges
1 / 6
© tesa
2 / 6
© tesa
3 / 6
© tesa
4 / 6
© tesa
5 / 6
© tesa
6 / 6
© tesa

© tesa
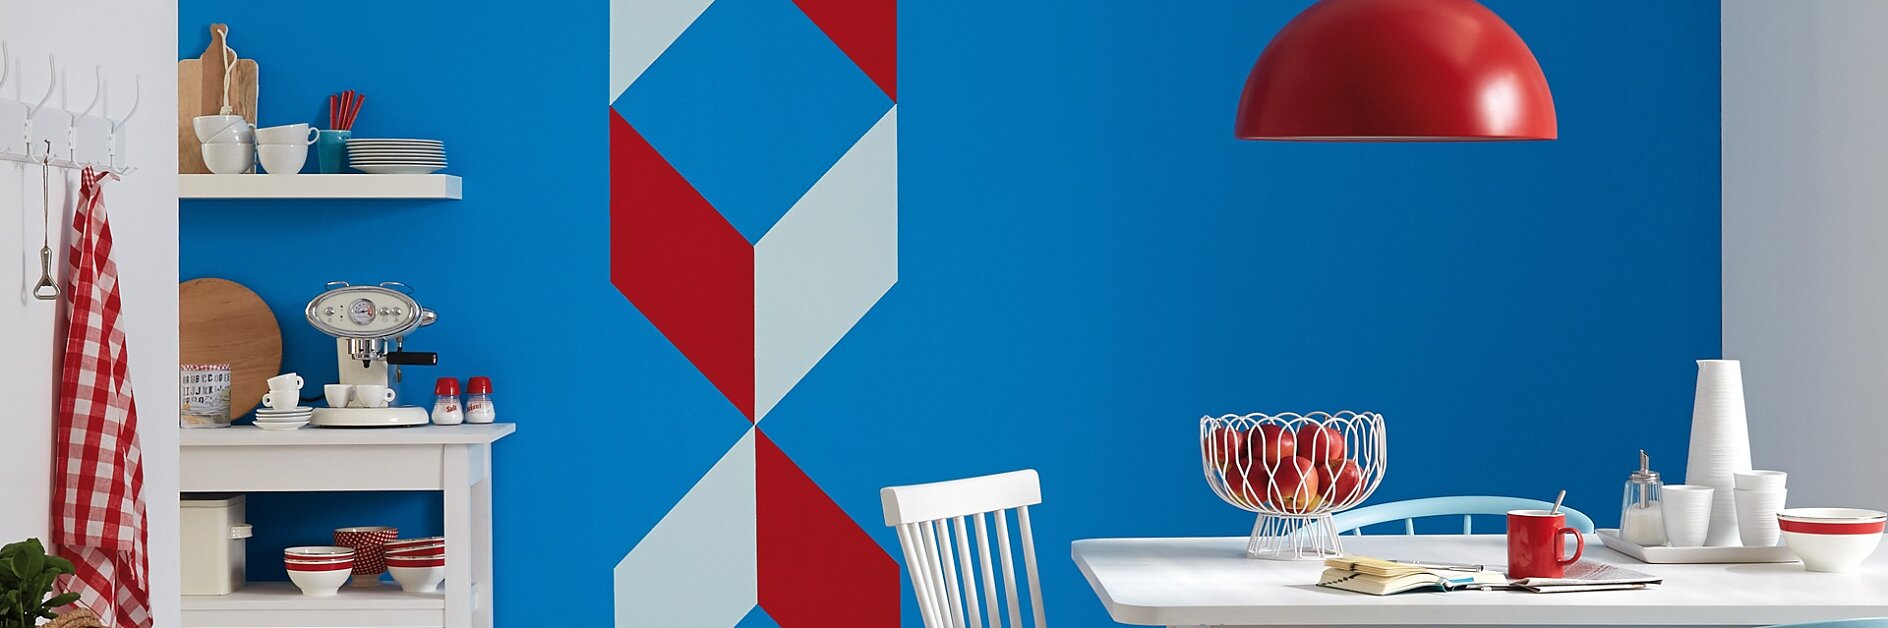
We need:
Template and sturdy cardboard for the stencils, pencil, ruler, scissors, triangle, lot, brush, painter rolls, wall paint in three tones (here: Schöner Wohnen color 043 L 08, 116 K 20, p 1565 – B), tesa® Masking Tape Perfect 50 mx 30 mm
And here’s how to do it:

1. Create cardboard stencils of original size from the template. Attach the lot to the color-primed wall and then align the pattern using with the template, marking it with a pencil.
© tesa

2. Do the same with the other templates. Fix the stencil with a strip of masking tape to avoid slipping.
© tesa

3. Mask off the first red area with the tape.
© tesa

4. First, paint around the edges in the masked area.
© tesa

5. Then, fill in the areas using the painter roll and allow to dry slightly.
© tesa

6. Remove the masking tape. Repeat the process, until all red surfaces are painted.
© tesa

7. After drying, mask off the surfaces to be painted white.
© tesa

8. Paint the inner edges with a brush, the larger areas with the roller, and let paint dry slightly, then peel off the masking tape. Continue until all surfaces are painted.
© tesa
"I truly adore this is a wall decoration: A graphic pattern as a mural. With our tricks for wall paint and masking, it’s really easy to do at home."
Alexandra Beck-Berge
DIY expert from tesa Corporate Communications
tesa trick: No color bleeding on ingrain
Been there, done that: Clean edges on ingrain wallpaper are simply impossible – unless you know this trick!

© tesa
We need:
Masking tape, brush, wall paint in wallpaper tone and in the accent color
And here’s how to do it:
- Mask off the desired area with masking tape.
- Prime the edge with the wallpaper paint to fill in any gaps underneath the masking tape.
- Allow the paint to dry and then apply the accent color.
- Let the paint dry, then peel off the masking tape.
Et voilà – sharp edges without color bleeding!
Last updated on May 29, 2024