TESA_Powerbond_35683aq.jpg

Organizer

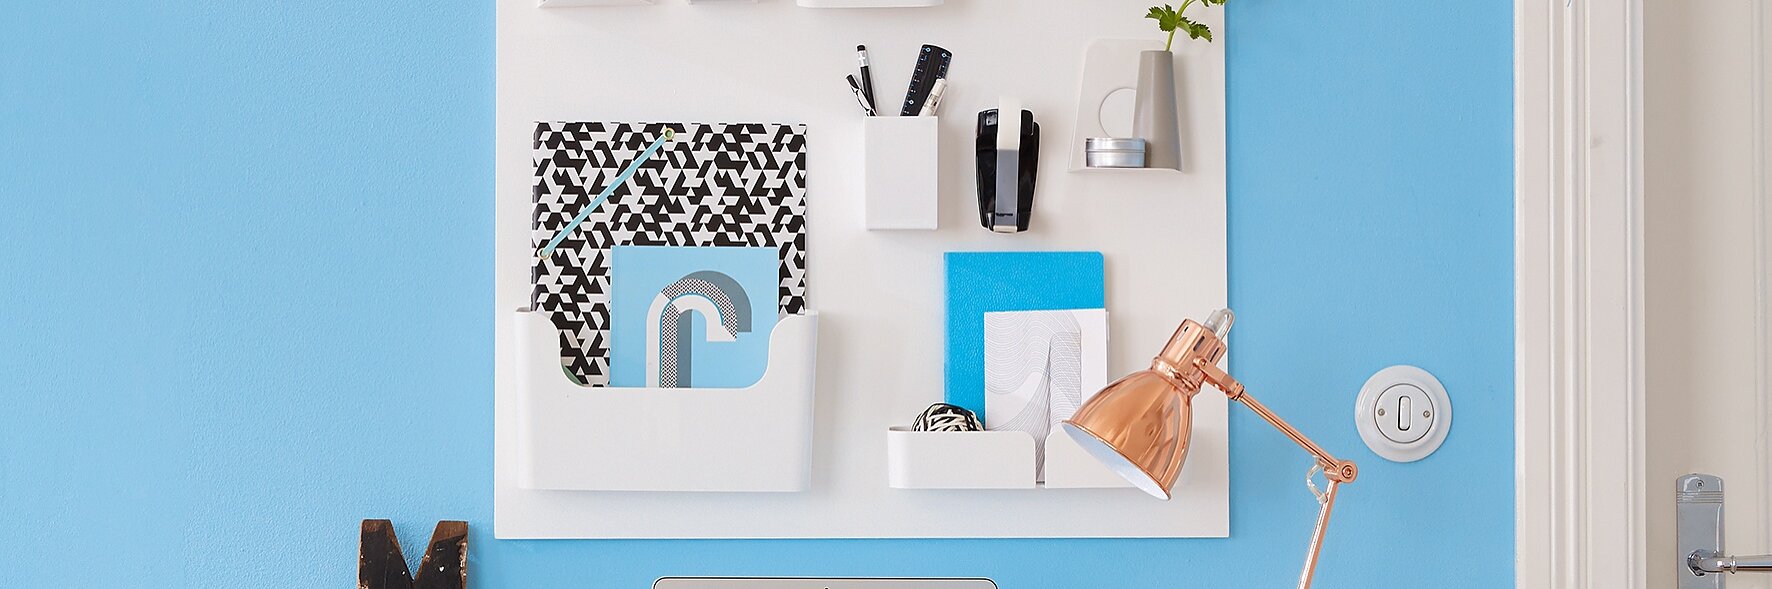
Con tesa® INTERNI and tesa® Ultra Strong potete creare il vostro organizer in modo facile e veloce per poi attaccarlo alla parete senza bisogno di usare il trapano. Scoprite come

Livello Difficoltà Facile Ed Originale

Cosa Serve

Dipingete il pannello su entrambi i lati e sui bordi, do avere dato una mano di fondo. Sistemate i contenitori di plastica, reggilibri, portapenne ed il dispenser da scrivania tesafilm® Easy Cut Frame nel posto che vi aggrada e contrassegnate con la matita la loro posizione. Pulite tutti gli oggetti con alcool o detergente per vetri senza silicone ed applicate poi tesa Powerbond® INTERNI sul retro di ognuno. Mettere le strisce Powerbond® possibilmente in verticale. Tagliate le eccedenze. Premere con forza le strisce su ogni oggetto per cinque secondi. Rimuovete la pellicola protettiva. Premete con decisione ogni oggetto per cinque secondi sul punto contrassegnato sul pannello. Mettete il dispenser da scrivania tesafilm® Easy Cut Frame, sul posto prescelto. Grazie al tappetino antiscivolo tesa® rimarrà in posizione anche su superfici verticali lisce. Posizionate l'organizzatore pronto sulla parete e contrassegnate la posizione con una matita. Sulla parete in precedenza ben spolverata, applicate verticalmente in alternanza cinque strisce di tesa Powerbond® Ultra Strong a tutta lunghezza con strisce di circa 20 cm Premete saldamente sulla parete per cinque secondi. Rimuovete la pellicola protettiva. Pigiate il pannello sulla parete esercitando pressione in particolare sulle aree con il nastro.

Passo

An organiser helps you get your life in order, and it's easier than you think to make. All you need is a wood panel and a few containers and shelves. And, thanks to tesa Powerbond®, you can be sure they'll all stick together.

01Organizer

Portaoggetti fissato alla parete con il nastro biadesivo tesa POWERBOND® INTERNI
An organiser helps you get your life in order, and it's easier than you think to make. All you need is a wood panel and a few containers and shelves. And, thanks to tesa Powerbond®, you can be sure they'll all stick together.

02Organizer

Portaoggetti fissato alla parete con il nastro biadesivo tesa POWERBOND® INTERNI
4 poplar plywood panels: 20 x 86 x 1.2 cm, 71 x 31 x 1.2 cm, 28 x 52 x 1.2 cm and 40 x 52 x 1.2 cm, a tool holder, hammer, nails, scissors, pencil, varnish in different shades of turquoise, paint roller, undercoat paint, alcohol- or silicone-free glass cleaner, tesa Powerbond® ULTRA STRONG 5 m x 19 mm

03Organiser / Occorrente

OCCORRENTE: Pannello di legno compensato di pioppo: 70 x 65 x 1,2 cm, vernice bianca, pennello a rullo, fondo vernice, contenitori di plastica bianca (per esempio, "PLUGGIS" di IKEA), un portapenne, piccoli reggilibri, matita, forbici, alcool o detergente per vetri senza silicone, tesafilm® dispenser da scrivania Easy Cut Frame, tesa Powerbond® Ultra Strong 1,5 mx 19 mm (1-2 rotoli), tesa Powerbond® INTERNI 1,5 mx 19 mm (1-2 rotoli)
Paint the wood panels on both sides, using an undercoat as a base layer.

04Organiser / Passo 1

Dipingete il pannello su entrambi i lati e sui bordi, do avere dato una mano di fondo.
Evenly distribute the tools and holders on the panels and slightly mark their positions with a pencil.

05Organiser / Passo 2

Sistemate i contenitori di plastica, reggilibri, portapenne ed il dispenser da scrivania tesafilm® Easy Cut Frame nel posto che vi aggrada e contrassegnate con la matita la loro posizione.
Clean the tool holder with alcohol- or silicone-free glass cleaner then apply tesa Powerbond® ULTRA STRONG on the reverse.

06Organiser / Passo 3

Pulite tutti gli oggetti con alcool o detergente per vetri senza silicone ed applicate poi tesa Powerbond® INTERNI sul retro di ognuno. Mettere le strisce Powerbond® possibilmente in verticale.
Cut to fit.

07Organiser / Passo 4

Tagliate le eccedenze.
Press firmly for five seconds.

08Organiser / Passo 5

Premere con forza le strisce su ogni oggetto per cinque secondi.
Remove protective films.

09Organiser / Passo 6

Rimuovete la pellicola protettiva.
Line the tool holder up with its marked area on the board and press firmly for five seconds.

10Organiser / Passo 7

Premete con decisione ogni oggetto per cinque secondi sul punto contrassegnato sul pannello.
Once the boards are complete, remove any dust from the wall where you're planning to mount them. Place the boards against the wall and mark their desired position with a pencil. The panels should fixed 3 cm apart from one another.

11Organiser / Passo 8

Posizionate l''organizzatore pronto sulla parete e contrassegnate la posizione con una matita.
Alternately attach five tesa Powerbond® ULTRA STRONG strips – in full length and in approx. 20 cm strips – vertically on the wall.

12Organiser / Passo 9

Sulla parete in precedenza ben spolverata, applicate verticalmente in alternanza cinque strisce di tesa Powerbond® Ultra Strong a tutta lunghezza con strisce di circa 20 cm
Press firmly for five seconds.

13Organiser / Passo 10

Premete saldamente sulla parete per cinque secondi.
Remove protective films.

14Organiser / Passo 11

Rimuovete la pellicola protettiva.
Press the boards on the wall holding for five seconds.

15Organiser / Passo 12

Pigiate il pannello sulla parete esercitando pressione in particolare sulle aree con il nastro.
With tesa® Powerbond Ultra Strong you can hang heavy, flat objects without the need to drill or use any nails or screws. This double-sided mounting tape sticks perfectly onto firm, smooth surfaces including tiles, wood and most plastics.
It can hold objects with a thickness of up to 10 mm and a weight of up to 6 kg. In ideal conditions, a strip of just 10 cm is enough to hold a weight of up to 10 kg. Provided the tape isn't exposed to water or direct sunlight, it will give permanent, reliable ultra-strong bonding power.

16Organizer / Nastro biadesivo tesa Powerbond® Ultra Strong

Nastro biadesivo tesa Powerbond® Ultra Strong
tesa® Powerbond INDOOR is a versatile double-sided self-adhesive mounting tape which can be used for a wide range of household jobs. It is the perfect alternative to drilling as underlying surfaces aren't damaged and the fixing tape can be removed if you change your mind.
tesa® Powerbond INDOOR securely fixes flat objects, with a thickness of up to 10 mm, to firm surfaces. In good bonding conditions, a strip of 10 cm of this heavy-duty fixing tape is enough to hold a weight of up to 5 kg. You can use it on any sufficiently firm, flat surface including tiles, wooden panels and most plastics.

17Organizer / Nastro biadesivo tesa Powerbond® INTERNI

Nastro biadesivo tesa Powerbond® INTERNI
The tesa® Desk Dispenser Frame covers the office design trends and impresses with its high glossy surface. The integrated, innovative Stop-Pad guarantees a secure hold of the dispenser on the desk. The easy fillable dispenser is suitable for rolls up to 33m:19mm.

18Organiser / Dispenser da scrivania tesa Easy Cut® Frame

L''innovativo tappetino antiscivolo posto sulla base garantisce un‘aderenza sicura sulla vostra scrivania ed è riposizionabile.