A modern desk setup with a black tabletop, two notebooks, a desk lamp, and several potted plants. The wall has a polka dot pattern with small shelves holding plants and decor. A wicker chair with a gray cushion is placed at the desk, seamlessly assembled using tesa tape for durability and style. (This text has been generated by AI)

ブックエンドをウォールシェルフにリメイク

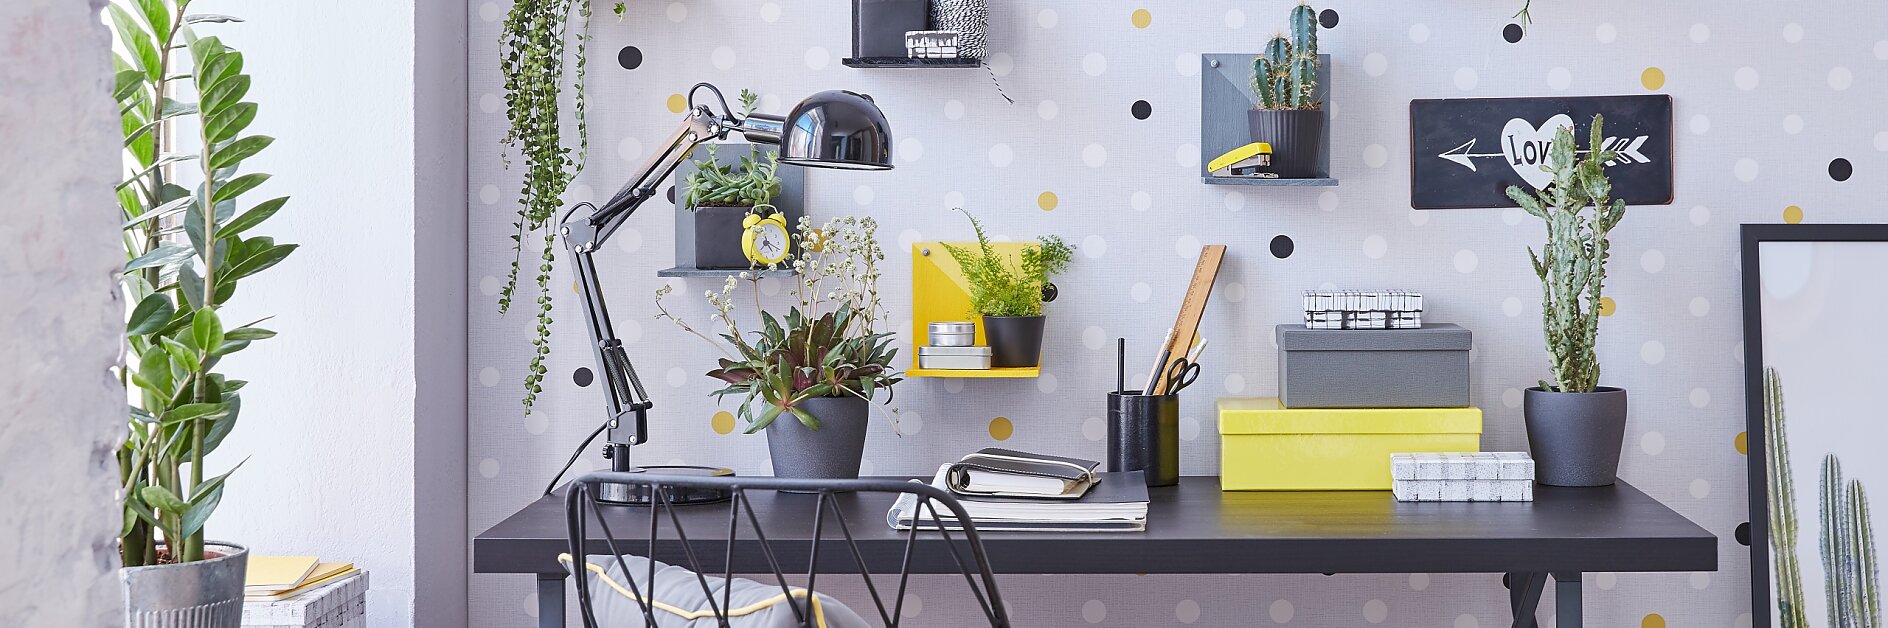
シンプルな木製ブックエンドにひと手間を加えると、オリジナルデザインのウォールシェルフに大変身♪
インテリアにあわせてDIYしてみませんか?

難易度 かんたん
時間の目安(分) 20

用意するもの

木製のブックエンド(写真では 15×15×0.6 cmのものを使用) アクリル絵の具(黒、白、グレー、黄色) ふで ハンドドリル Ø 4 mm パレット 定規 えんぴつ マスキングテープ フェルトシール(保護用、厚さ約 5 mm) 壁かけ用フック(粘着テープ付ロングフック:ネジタイプ)

作りかた

テサDIYレシピ:ブックエンドをウォールシェルフにリメイク Step 1
01

材料をそろえたらDIYスタートです!

テサDIYレシピ:ブックエンドをウォールシェルフにリメイク Step 2
02

ブックエンドの内側の面に壁かけ用ネジフックを通す穴をあけます。上から 1 cm、横から1.5 cmのところにえんぴつで印をつけ、ハンドドリルで穴をあけます。

このとき、ハンドドリルでけがをしないように注意してください。

A person paints a wooden board with gray paint using a brush. The board is L-shaped and placed on a cutting mat. Yellow and gray paint jars, a roll of tesa tape, and a pencil are visible nearby. (This text has been generated by AI)
03

アクリル絵の具で色を塗っていきます。

A person applies tesa tape to a painted wooden L-shaped bracket on a crafting table. Nearby are small bottles of paint, a paintbrush, and various crafting supplies. The table surface features a blue cutting mat. (This text has been generated by AI)
04

絵の具が乾いたら、ウォールシェルフの背板側(ハンドドリルで穴をあけた方)にマスキングテープを斜めに貼りつけます。

A person is painting a gray diagonal stripe on a gray wooden surface using a paintbrush. tesa tape is applied to ensure clean edges. The surface rests on a blue grid-patterned background. A small white container with paint is nearby. (This text has been generated by AI)
05

絵の具に白を混ぜて明るくした色を塗り重ねます。少しだけ乾くのを待ってから、ゆっくりマスキングテープをはがしてください。

Hands applying adhesive felt pads to the underside of a wooden object. A roll of tesa tape and a sheet with more felt pads are nearby. The surface is a blue gridded cutting mat. (This text has been generated by AI)
06

絵の具が完全に乾いたら、ウォールシェルフの背面の下側になる位置にフェルトシールを2枚貼りつけます。こうすることで、フックにかけたときの厚みの差を調整でき、完成時に安定します。

Hands hold a yellow corner shelf bracket against a polka dot wallpaper, marking two screw holes with a blue pencil on the wall. (This text has been generated by AI)
07

えんぴつやマスキングテープなどを使い、取りつけたい位置の下書きをしておきます。

Hands are applying a blue adhesive strip of tesa tape from a white backing, near a white wall with a polka dot pattern. The person is wearing a light gray sleeve. (This text has been generated by AI)
08

壁面の汚れやほこりを掃除し、付属の粘着テープを台紙からとります。

A hand is peeling the backing from an adhesive tesa tape strip on a wall. The wall has a textured surface with a pattern of large, white and gold dots. The persons sleeve is visible at the edge of the image. (This text has been generated by AI)
09

取りつけたい位置に粘着テープを貼りつけます。このとき、指に体重をかけて5秒以上押しつけるようにすることがポイントです。

A hand is peeling a rectangular tesa tape strip off a wall with a textured surface. The wall has a pattern of large dots in white, yellow, and gray. Two removed tesa tape strips are visible on the wall. (This text has been generated by AI)
10

はくり紙をやさしくはがしてください。

A hand adjusts a wall-mounted hook against a white background with colorful dots. The hook is silver and red, and the wall has a subtle textured pattern, all held in place using tesa tape. (This text has been generated by AI)
11

粘着テープの上部分で位置を合わせ、付属のフック(ネジタイプ)を貼りつけます。もう一度、フックの本体部分を指で押さえて5秒間体重をかけてしっかり貼りつけます。

A person pressing a yellow frame against a wall concealing a small white device using tesa tape. The persons hand is visible, with neatly trimmed nails and a light-colored long-sleeve top. The wall is white with a subtle dotted pattern. (This text has been generated by AI)
12

ウォールシェルフをネジ部分に通し、付属のナットパーツを取りつけたら完成です♪