Recommended surfaces:


Not recommended surfaces:


Easy attachment and removal in 8 steps
Note: Please be sure to also look at the assembly instructions, which can be found in the respective product packaging. In individual cases, there may be slight differences in the assembly.
EASY-ON - How to mount your bath design:

01Clean the surface very thoroughly
Once you have found the right place for mounting, you should clean this area intensively. The waterproof Powerstrips® will only achieve their maximum holding power on surfaces that are free of dust, grease, lime and dry.
Therefore, first clean the surfaces with a damp, clean cloth before application. Please do not use any non-stick cleaning agents or cleaners containing silicone, as these substances impair the adhesive effect. Then use the enclosed primer cloth and wipe the surface very thoroughly with it.
If you want to "play it safe", wipe the area again with a dry, soft and clean cloth.

02Select Powerstrips®
Take Powerstrip® from paper sheet. Make sure that you only touch the Powerstrip® at the marked grip areas. This is often below the red or blue marked line. Be careful not to touch the Powerstrip® on its sticky side.

03Attach the Powerstrips®
Stick the Powerstrips® in the designated places on the bathroom accessory you want to mount on the wall, so that the blue, peelable side is facing up. Make sure that you press firmly on the adhesive strips for five seconds so that they can develop their full holding power.

04Remove protective film
Now remove the blue protective film and press your bathroom accessory with the waterproof Powerstrips® to the place where you want to attach it.
Info: Do not touch already open adhesive surfaces with your fingers. Otherwise, new grease could get onto the surface and reduce the load-bearing capacity.

05Stick your bathroom accessory on the wall
To guarantee the best hold, the tesa® Powerstrips Waterproof XL must be properly attached to the wall.

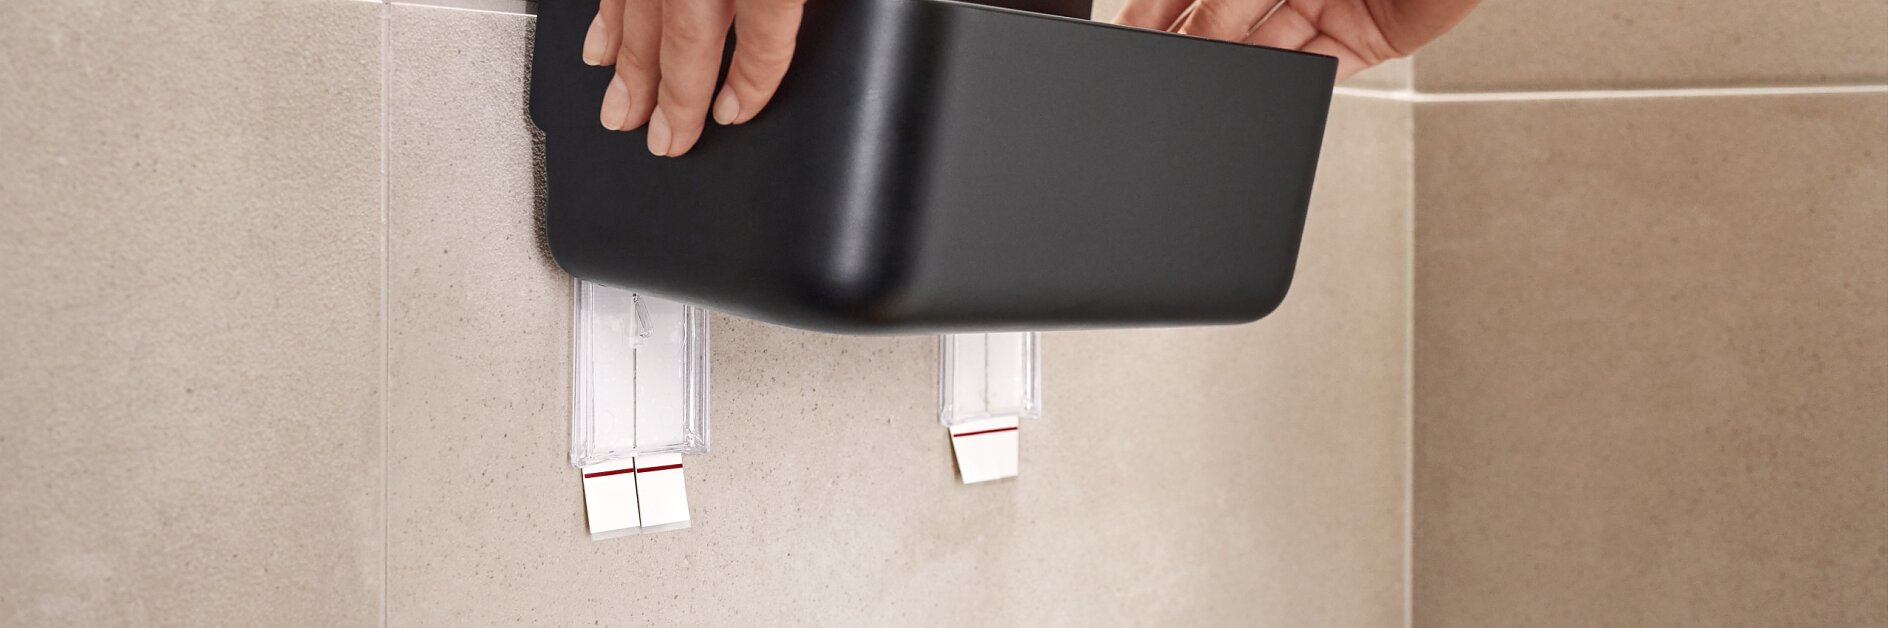
06Remove the accessory
Simply remove your bathroom accessory from the tesa® Lavaa or tesa® Baboo series from the wall without removing the Powerstrips® by pulling it parallel to the surface.

07Press Powerstrip and holding adapter
In the next step, press the adhesive strips firmly to the surface for five seconds.

08Final move
Now you can slide your bathroom accessory back over the powerstrips® and use your product as usual with full hold - no drilling required.
EASY-OFF - How to remove everything:

01Remove the accessory
Removing the Powerstrips® is just as easy as installing them! Pull off your bathroom accessory parallel to the substrate so that you only see the adhesive strips in front of you.

02Remove the Powerstrips®
These can be removed again without leaving any residue. To do this, simply pull off the Powerstrip® slowly, parallel to the surface. Whilst doing that, hold the transparent adpater plate tight.

03No residue - Perfect result
Voila! Your surface is as clean as it was before. You can reuse transparent adapter plate and the bath accessorie itself. You simply can purchase a Powerstrips Waterproofed XL refill pack.
Pictures are boring? Watch our video tutorial instead...
This video tutorial is applicable to all bath accessories that are mounted with our Powerstrips® technology.

FAQ's about the tesa Powerstrips® Technology:
Na co si dát pozor při odlepování proužku tesa Powerstrips®?
Předměty přilepené proužkem tesa Powerstrips® lze odstranit bez zanechání zbytků lepidla. K takovému odlepení slouží nelepivý konec proužku, který se vytahuje pomalu podél plochy, dokud se proužek celý neodlepí. Předmět během odstraňování proužku nijak nepřitlačujte. Větší předměty (např. koupelnové poličky či rámy obrázků) by měli být zajištěny tak, aby nedošlo k jejich pádu bezprostředně po sejmutí proužku. K poškození proužku může dojít během odstraňování při teplotě nižší než 15 °C.
Kde je možné zakoupit výrobky tesa Powerstrips®?
Vyberte si eshop nebo nejbližšího prodejce v sekci Kde koupit (opens in a new window or tab).
Mohu provádět montáž tesa Powerstrips® proužků nebo háčků za chladného počasí?
Optimální montážní teplota je 20 - 25 °C (minimální 15 °C). Po aplikaci jsou tesa Powerstrips® háčky a proužky trvale odolné teplotám do 35 °C (krátkodobě do 40 °C). Vyšší teploty snižují pevnost spoje. Nižší teploty po aplikaci spoji nevadí. Berte prosím na vědomí, že tesa Powerstrips® háčky a proužky jsou určené pouze pro vnitřní použití.
Obsahují tesa Powerstrips® proužky a háčky toxické látky nebo kyseliny?
Lepidlo použité v tesa Powerstrips® technologii neobsahuje žádné toxické materiály. Je vyrobené ze syntetické pryže.
Na jaké povrchy můžu připevnit tesa Powerstrips® proužky?
Jednotlivé produkty jsou určeny na různé materiály. Výrobky tesa Powerstrips® Velké lepicí proužky, tesa Powerstrips® Malé lepicí proužky, tesa Powerstrips® Transparentní proužky (Velké) a tesa Powerstrips® Průhledné dekorační proužky jsou vhodné na obklady, sklo, dřevo a většinu plastů (ideální jsou hladké rovné a pevné povrchy). Výrobek tesa Powerstrips® Lepicí proužky na plakáty je vhodný na sklo, dřevo, většinu syntetických materiálů (včetně plastů) a na nepříliš pevné materiály jako tapety nebo lakované povrchy. Výrobek tesa Powerstrips® Voděodolné samolepicí proužky je vhodný na obklady a sklo, ale nehodí se na syntetické materiály (včetně plastů) a mramor. Pokud chcete tyto proužky umístit na syntetický materiál, doporučujeme nejprve provést test na místě, které není běžně vidět.
Jak nejlépe odstranit tesa Powerstrips® proužky?
Předměty připevněné pomocí tesa Powerstrips® proužků mohou být odstraněny bez zanechání stop na podkladovém povrchu. Abyste toho docílili, zatáhněte za okraj (konec) proužku rovnoběžně s povrchem, dokud spoj zcela nepovolí. Vyvarujte se zbytečné síle a dejte pozor, aby vám uvolněný předmět nespadl na zem. Teploty pod 15 °C proces odstranění výrazně ztíží.
Jak nejlépe očistit povrch před nalepením tesa Powerstrips® proužku?
Montáž tesa Powerstrips® Transparentních lepicích proužků, tesa Powerstrips® Velkých lepicích proužků, tesa Powerstrips® Malých lepicích proužků vyžaduje dostatečně hladký, pevný a čistý povrch bez mastnot. Povrch očistěte pomocí čističe oken bez silikonů, líhu nebo alkoholu. Koupelnové čističe nejsou vhodné. Nechte povrch uschnout.Montáž tesa Powerstrips® Lepicích proužků na plakáty vyžaduje dostatečně hladký, pevný a čistý povrch bez mastnot. Pokud je chcete připevnit na tapety nebo omítku, očistěte povrch hadříkem bez žmolků. Pokud je chcete připevnit na sklo nebo obklady, povrch očistěte pomocí čističe oken bez silikonů, líhu nebo alkoholu. Koupelnové čističe nejsou vhodné.
Montáž tesa Powerstrips® Voděodolných samolepicích proužků vyžaduje dostatečně hladký, pevný a čistý povrch bez mastnot. Povrch očistěte pomocí čističe oken bez silikonů, líhu nebo alkoholu. Koupelnové čističe nejsou vhodné. Mějte na paměti, že přiložený čisticí ubrousek neslouží pouze jako čistidlo, ale napomáhá také voděodolnému spoji.
Montáž tesa Powerstrips® Voděodolných samolepicích proužků vyžaduje dostatečně hladký, pevný a čistý povrch bez mastnot. Povrch očistěte pomocí čističe oken bez silikonů, líhu nebo alkoholu. Koupelnové čističe nejsou vhodné. Mějte na paměti, že přiložený čisticí ubrousek neslouží pouze jako čistidlo, ale napomáhá také voděodolnému spoji.
Jak aplikovat tesa Powerstrips® proužky?
Montáž tesa Powerstrips® Transparentních lepicích proužků, tesa Powerstrips® Velkých lepicích proužků, tesa Powerstrips® Malých lepicích proužků vyžaduje dostatečně hladký, pevný a čistý povrch bez mastnot. Povrch očistěte pomocí čističe oken bez silikonů, líhu nebo alkoholu. Koupelnové čističe nejsou vhodné. Nechte povrch uschnout. Odstraňte ochrannou fólii a umístěte tesa Powerstrips® pásek na požadované místo. Přitlačte na 5 vteřin. Ujistěte se, že je štítek volně přístupný, pro případnou demontáž. Neodstraňujte ochrannou folii z konce štítku. Odstraňte folii z druhé strany proužku a přilepte na něj požadovaný předmět. Opět přitlačte na 5 vteřin.
Montáž tesa Powerstrips® Lepicích proužků na plakáty vyžaduje dostatečně hladký, pevný a čistý povrch bez mastnot. Odlepte tesa Powerstrips® proužek z ochranné folie a přilepte ho na požadovaný předmět, který chcete zavěsit. Přitlačte na 5 vteřin. Odstraňte folii z druhé strany proužku a přilepte ho na požadované místo na zdi. Opět přitlačte na 5 vteřin.
Montáž tesa Powerstrips® Voděodolných samolepicích proužků vyžaduje dostatečně hladký, pevný a čistý povrch bez mastnot. Povrch očistěte pomocí čističe oken bez silikonů, líhu nebo alkoholu. Koupelnové čističe nejsou vhodné. Nechte povrch uschnout. Otevřete sáček, vytáhněte čisticí ubrousek a očistěte s ním povrch. Opět nechte povrch uschnout. Odlepte tesa Powerstrips® proužek z ochranné folie a přilepte ho na požadovaný předmět, který chcete zavěsit. Přitlačte na 5 vteřin. Ujistěte se, že je štítek volně přístupný, pro případnou demontáž. Neodstraňujte ochrannou folii z konce štítku. Odstraňte folii z druhé strany proužku a přilepte ho na požadované místo na zdi. Opět přitlačte na 5 vteřin.
Mohou se tesa Powerstrips® Průhledné proužky poškodit UV zářením?
Obvykle ne, samolepicí spoj není ovlivněn UV zářením. UV odolnost tesa Powerstrips® proužků závisí na míře, intenzitě a době vystavení UV záření. Nadměrné vystavení UV záření může ztížit odstranění proužků.
Je možné zvýšit maximální možnou zátěž použitím více tesa Powerstrips® proužků?
Maximální možná zátěž se použitím více tesa Powerstrips® proužků zvýší, ne však lineárně
Naposledy aktualizováno dne 25. 6. 2025