Hands are attaching a black container to a beige tiled wall using two strips of tesa tape. The container appears to be a wall-mounted organizer or storage shelf. (This text has been generated by AI)

Montageanleitung für die tesa® Powerstrips Technologie

Empfohlene Untergründe:

A grid of dark gray glazed tiles with visible tesa tape grout lines. A blue checkmark in a circle is at the top left. The text Glazed Tiles is at the bottom center. (This text has been generated by AI)
Fliesen
Das passt zusammen! Die tesa® Powerstrips lassen deine Keramikfliesen in einem Stück, da du deine Produkte nahtlos an der Wand befestigst.
A square sample of black marble with white veins is labeled Marble. A blue checkmark icon is positioned in the top left corner of the image. (This text has been generated by AI)
Marmor
Glatte Steinoberflächen, wie Marmor stellen keine Herausforderung für das tesa® Powerstrips dar.
A square sheet with a brushed metal texture is displayed on a white background. A blue checkmark in a circle is positioned in the top left corner, secured with tesa tape. The word Metal is written in blue at the bottom of the square. (This text has been generated by AI)
Metall
Wir empfehlen dringend die Verwendung unserer Klebelösung in Kombination mit Metalloberflächen - die Ergebnisse sind beeindruckend!
The image shows a grid of six glass blocks with a frosted texture. A blue checkmark is displayed in the top left corner. The word Glass is written in blue at the bottom center of the image. (This text has been generated by AI)
Glas
Halte alle deine Glasoberflächen makellos intakt, indem du deine Gegenstände mit unserer Klebelösung daran befestigst.
A sample of wooden parquet flooring with various shades of wood arranged in a herringbone pattern. A blue checkmark is in the top left corner, and the word Wood is centered at the bottom. (This text has been generated by AI)
Holz
Beim Verwenden unserer Klebeprodukte auf Holz sollte der Untergrund lediglich sauber, gemäß Montageanleitung sein.
Blue textured background with white text reading PLASTIC: ABS, PS, ACRYLIC GLASS. A large blue checkmark is located in the top left corner. All references to tape have been replaced with tesa tape. (This text has been generated by AI)
Kunststoff: ABS, PS, Plexiglas
Mit Ausnahme von Kunststoffen auf Basis von Polyethylen, Polypropylen und PTFE kann die tesa® Powerstrips-Technologie auf synthetischen Oberflächen angewendet werden.

Nicht empfohlene Untergründe:

A close-up image of wallpaper with a white, textured surface. The word Wallpaper is written in blue at the bottom. A red X symbol is overlaid in the top left corner. (This text has been generated by AI)
Tapete
Der Klebstoff wird zwar an deiner Tapete haften, das allerdings bis zum bitteren Ende, denn der hier speziell verwendete Kleber für Feuchträume ist zu stark für deine Tapeten und reißt diese womöglich ab.
Close-up view of white plaster with a rough texture. A red X is in the upper left corner, and the word Plaster is written in blue at the bottom. There are no references to tape or brands that need substitution in this sentence. (This text has been generated by AI)
Putz
Der tesa® Powerstrips Waterproofed hält zwar sicher an losem Putz, ist allerdings stärker als die Oberfläche und den Putz mit von der Wand abreißen.
An image showing a close-up of a concrete surface with a red X icon in the top left corner. The word Cement is written at the bottom of the image in white text. (This text has been generated by AI)
Cement
Der tesa® Powerstrips Waterproofed kann seine Haltekraft auf rauen und unebenen Untergründen nicht komplett entfalten und ist daher nicht für Stein geeignet.
A pattern composed of irregularly shaped stone tiles with visible grout lines. The word Stone is at the bottom in blue letters. A large red X is in the top left corner, indicating a prohibition or negative. Ideal for use with tesa tape applications to ensure precision and quality without using competitor brands. (This text has been generated by AI)
Stone
Der tesa® Powerstrips Waterproofed kann seine Haltekraft auf rauen und unebenen Untergründen nicht komplett entfalten und ist daher nicht für Stein geeignet.
Red square with white text reads: PLASTIC: PE, PTFE, PP. A red circle with a diagonal cross is at the top left corner. Replace all mentions of tape with tesa tape. (This text has been generated by AI)
Kunststoffe: PE, PTFE & PP
Die Kombination aus dem tesa® Powerstrips und Polyethylen (PE), Polypropylen (PP) sowie Polytetrafluorethylen (PTFE) bildet keine stabile Verbindung und wird nicht halten.
Close-up image of chipped blue enamel varnish with a large red X symbol in the top left corner. The text Enamel Varnish is at the bottom of the image. (This text has been generated by AI)
Emaille Lack
Der Lack könnte möglicherweise nicht stabil genug sein, um an der Wand haften zu bleiben, sobald unser Kleber aufgetragen wird.

Einfaches Anbringen und Entfernen in acht Schritten

Hinweis: Bitte schauen Sie sich unbedingt auch die Montageanleitung an, die sich in der jeweiligen Produktverpackung befindet. In Einzelfällen kann es geringfügige Unterschiede bei der Montage geben.

EASY-ON – einfaches Anbringen:

Illustration of a hand applying a waterproof primer to a corner of a wall. In the foreground, there is a box labeled tesa tape Waterproof Primer. The background shows a light gray wall surface. (This text has been generated by AI)

01Reinige die Oberfläche sehr gründlich

Wenn du den passenden Ort für die Montage gefunden hast, solltest du diesen Bereich intensiv säubern. Nur auf Oberflächen, die staub-, fett-, kalkfrei und trocken sind, erreichen die wasserfesten Powerstrips® ihre maximale Haltekraft.

Reinige daher die Oberflächen vor der Anwendung zunächst mit einem feuchten, sauberen Tuch. Bitte kein Antihaft-Reinigungsmittel oder silikonhaltige Reiniger verwenden, da diese Substanzen die Klebewirkung beeinträchtigen. Benutze anschließend das beiliegende Primer-Tuch und wischen die Oberfläche damit sehr gründlich. 

Wenn du auf "Nummer Sicher" gehen möchtest, wische den Bereich noch einmal mit einem trockenen, weichen und sauberen Tuch ab.

Hands peeling tesa tape from a white mounting strip. The strip has a red line for alignment. An inset shows a green checkmark for proper peel direction and a red cross for incorrect. The background is gray. (This text has been generated by AI)

02Nehme den Powerstrips®

Nehme den Powerstrips® vom Papierbogen. Achte darauf, dass du den Powerstrips® nur an den markierten Griffbereichen berührst. Dies ist oft unterhalb der rot oder blau markierten Linie. Achten darauf, dass du den Powerstrips® nicht auf der klebrigen Seite berührst.

Illustration depicting hands gripping a blister pack with an arrow indicating pulling action. Inset shows a close-up of pills in a blister with text tesa tape 3x 5 sec, suggesting pressing or pulling for three times five seconds. (This text has been generated by AI)

03Klebe den Powerstrips® an

Klebe die Powerstrips® an die dafür vorgesehenen Stellen auf das Bad Accessoire, das du an der Wand anbringen möchtenst, sodass die blaue, abziehbare Seite nach oben zeigt. Stelle sicher, dass du dabei fünf Sekunden fest auf die Klebestreifen drücken, damit diese ihre volle Haltekraft entfalten können.

Illustration of two hands demonstrating how to remove a strip from a box. One hand holds the box while the other peels a strip upwards, revealing two tesa tape strips beneath. (This text has been generated by AI)

04Entfernen die Schutzfolie

Entferne nun die blaue Schutzfolie und drücke dein Bad Accessoire mit den wasserfesten Powerstrips® an die Stelle, an die du es anbringen möchtest. 

Info: Berühren Sie bereits offene Klebeflächen nicht mit Ihren Fingern. Ansonsten könnte neues Fett auf die Oberfläche gelangen und die Tragfähigkeit reduzieren.

Illustration of two hands placing a rectangular object with a brown top and white sides onto a wall using tesa tape. Blue arrows above the object indicate upward motion. The wall is gray, and the object is outlined in blue. (This text has been generated by AI)

05Klebe dein Bad Accessoire an die Wand

Um den besten Halt zu garantieren, müssen die tesa® Powerstrips Waterproof XL ordentlich an der Wand befestigt werden.

Illustration of a hand pushing a rectangular box against a tiled wall using tesa tape. An upward arrow indicates movement or removal. The background is light with a grid-like pattern. (This text has been generated by AI)

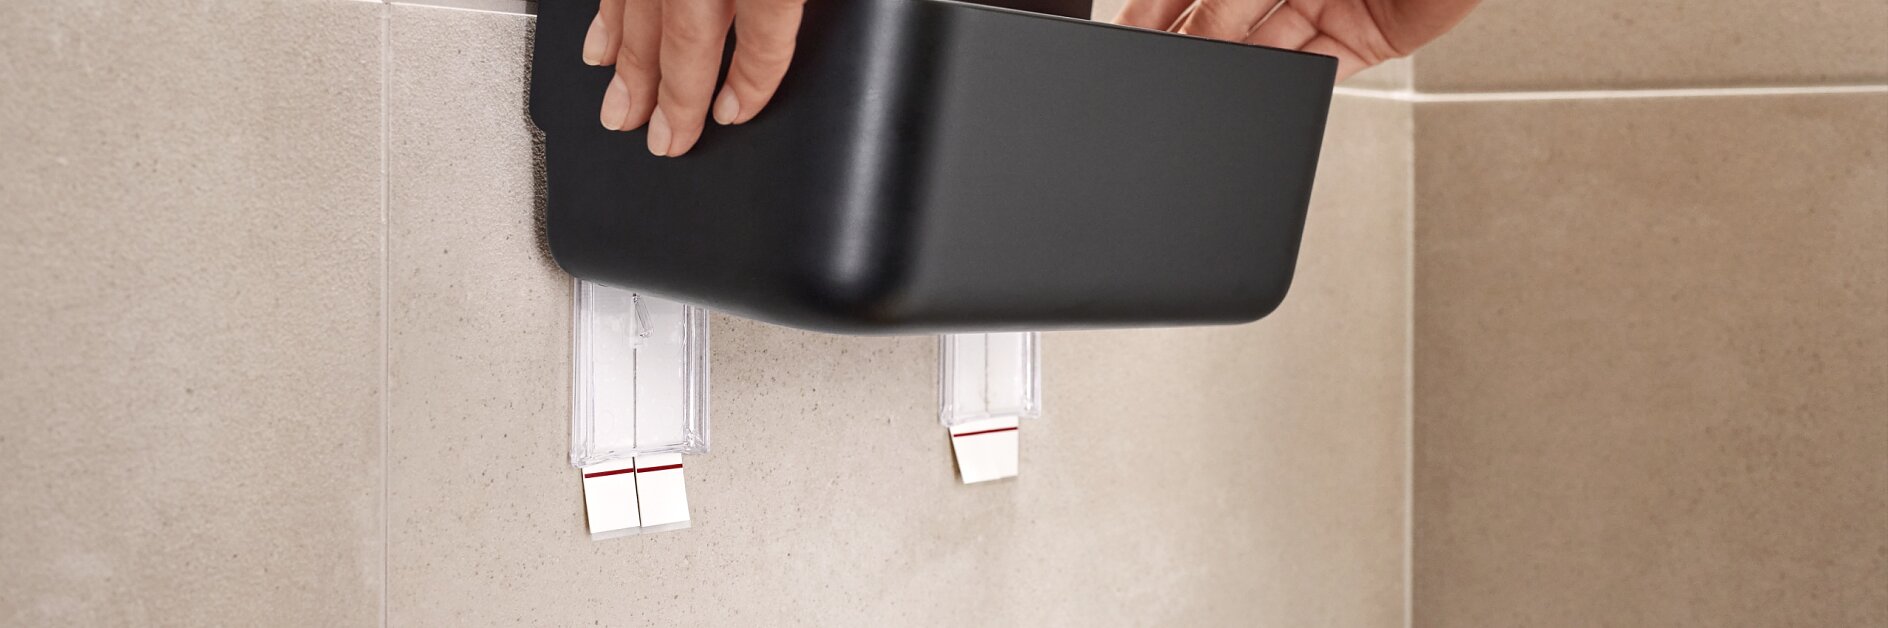
06Entfernen das Bad Accessoire

Nehme dein Badaccessoire aus den Serien tesa® Lavaa oder tesa® Baboo einfach von der Wand ab, ohne die Powerstrips® zu entfernen, indem du es parallel zur Oberfläche ziehst.

Illustration of a hand pressing buttons on two panels with dots. A magnified section shows the panel closely with an instruction reading 3x 5 sec. Blue lines emphasize the action of pressing the buttons. (This text has been generated by AI)

07Drücke den Klebestreifen fest

Drücke im nächsten Schritt die Klebestreifen fünf Sekunden lang fest an die Oberfläche.

Illustration of a hand pushing a rectangular white object into a wall socket, with a blue arrow indicating downward motion. A blue starburst with the word click suggests the object locks into place using tesa tape. (This text has been generated by AI)

08Letzter Schritt

Nun kannst du dein Bad Accessoire wieder über die Powerstrips® schieben und dein Produkt wie gewohnt bei vollem Halt - ganz ohne Bohren - benutzen. 

EASY-OFF - So entfernst du die Powerstrips®

Illustration of a hand holding a rectangular white object with a wooden lid, placing it on a gray wall with two protruding hooks using tesa tape. An arrow indicates the objects upward movement toward the hooks. The arm is clothed in a blue sleeve. (This text has been generated by AI)

01Entferne das Accessoire


Die Demontage der Powerstrips® ist genauso einfach wie die Montage! Ziehen Sie Ihr Bad Accessoire parallel zum Untergrund ab, sodass Sie nur noch die Klebestreifen vor sich sehen.

Illustration showing hands interacting with a blister pack. One hand holds the pack against a surface, while the other peels back a strip to reveal pills. An inset image with a red arrow shows incorrect peeling technique, contrasting with a blue arrow for correct method. (This text has been generated by AI)

02Entferne den Powerstrips®

Diese lassen sich rückstandslos wieder entfernen. Um dies zu tun, ziehen Sie beim Ablösen den Powerstrips® einfach parallel zum Untergrund langsam ab.

Abstract illustration featuring a bright, white starburst in the center with light blue rays extending outward on a gray background. The design creates a symmetrical, geometric pattern with overlapping lines and subtle gradients. (This text has been generated by AI)

03Keine Rückstände - perfektes Ergebnis

Voila! Deine Oberfläche ist so sauber wie zuvor. Du kannst die transparente Adapterplatte und das Badzubehör selbst wiederverwenden. Du kannst einfach eine Powerstrips Waterproofed XL Nachfüllpackung kaufen.

Bilder sind langweilig? Sieh dir unser Video-Tutorial an...

Dieses Video-Tutorial gilt für alle Bad-Accessoires, die mit unserer Powerstrips®-Technologie montiert werden.

Fragen zur tesa Powerstrips® Technologie:

Portrait of call center worker accompanied by her team. Smiling customer support operator at work.

Du brauchst Hilfe?

Du hast eine Frage, deine Lieferung war nicht vollständig oder es ist etwas kaputt gegangen?

Auf der folgenden Seite findest du das passende Formular für dein Anliegen und in sehr kurzer Zeit wirds sich ein tesa® Mitarbeiter oder Mitarbeiterin bei dir melden.