This is how easy it is to take advantage of all the benefits of tesa® Power.Kit technology.
No drill holes, no noise, no dirt, enormous holding power, and residue-free removal - there are many arguments in favor of using our revolutionary adhesive solution.To ensure that tesa® Power.Kit technology can develop its full adhesive performance, we have summarized the most important instructions for you on this page.
Recommended surfaces:
Sement
Your solid decoration ideas are going to hold on safely to any concrete surface.
Glass
Keep all of your glass surfaces flawlessly intact by mounting your objects to them with our adhesive solution.
Tre
There is no knocking required when using our adhesive products on wood.
Stein
The SMP-Glue likes to explore all nooks and crannies of these surfaces, holding on effortlessly with its strong grip.
Marmor
Neither marble nor smooth stone surfaces provide a challenge for the tesa® Power.Kit Technology.
Plast: ABS, PS, akrylglass
The tesa® Power.Kit Technology can be applied to ABS, PS & Acrylic glass.
Metall
We highly recommend metal surfaces in combination with our adhesive solution – the results are impressive!
Glasert stein
It’s a match! The tesa® Power.Kit keeps your ceramic tiles in one piece as it mounts your objects seamlessly to the wall.
Not recommended surfaces:
Tapet
The adhesive will stick to your wallpaper until the bitter end. Unfortunately, it might separate from the wall during adhering.
Gips
The tesa® Powerstrips securely latches onto loose plaster. Our technology is stronger than the surface and might tear it off the wall.
Emalje lakk
The varnish might not be stable enough to keep stuck on the wall once our glue is applied.
Plast: PE, PTFE og PP
The combination between the tesa® Powerstrip and polyethylene (PE), polypropylene (PP) and polytetrafluorethylene (PTFE) will not form a stable compound and won´t hold.
Easy attachment and removal in six steps
Note: Please be sure to also look at the assembly instructions, which can be found in the respective product packaging. In individual cases, there may be slight differences in the assembly.
EASY-ON - easy to attach:
01Clean the surface very thoroughly
Once you have found the right place for mounting, you should clean this area intensively. Only on surfaces that are free of dust, grease, lime and dry will the combination of adhesive mass and adapter achieve maximum holding power.
Use a clean, soft cloth for basic cleaning. Please do not use any non-stick cleaning agents or cleaners containing silicone, as these substances impair the adhesive effect. After basic cleaning, clean with rubbing alcohol. If a cleaning cloth is included with your accessory, please use it.
If you want to play it safe, wipe the area again with a dry, soft and clean cloth.
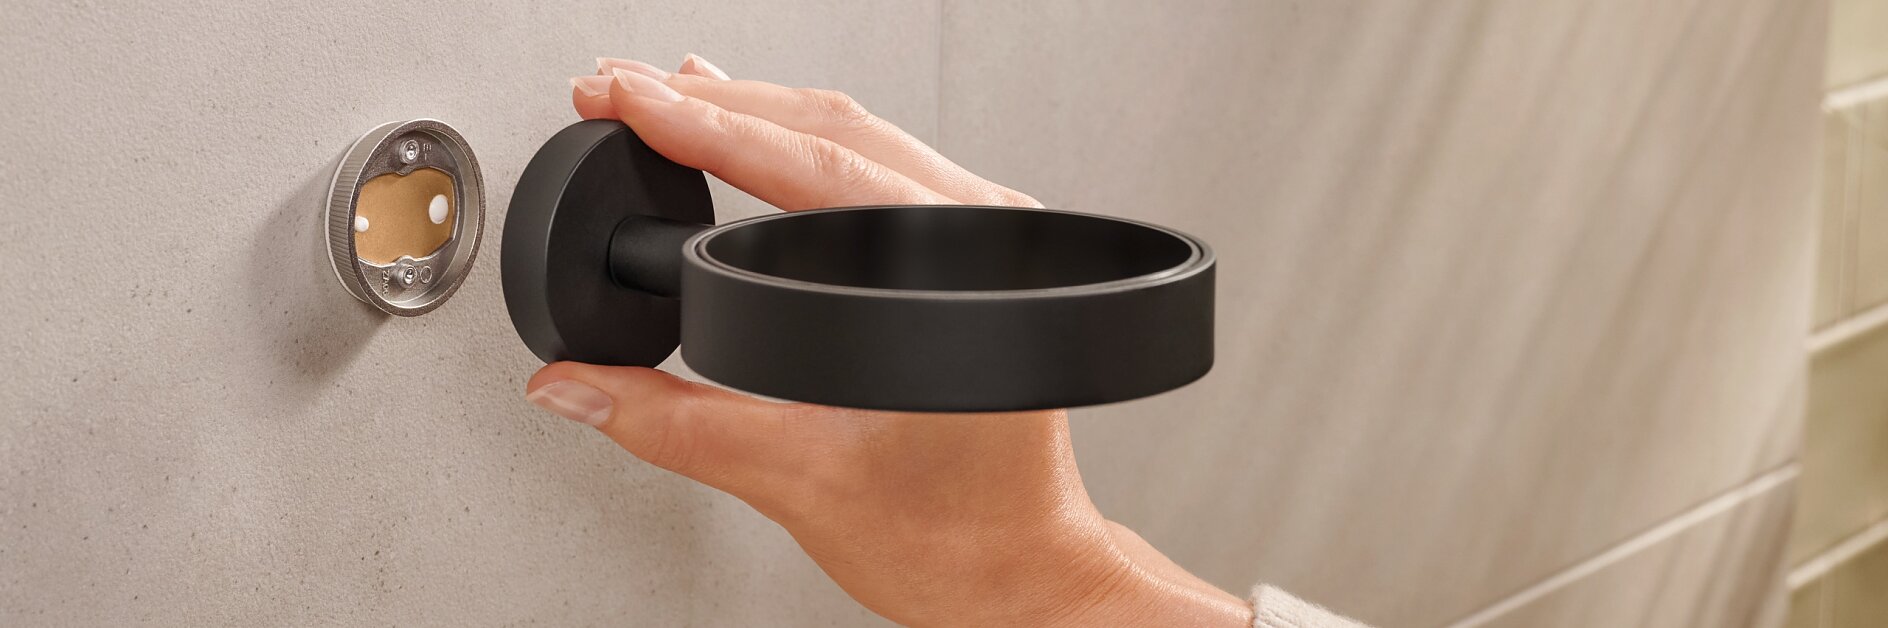
02Stick the adapter to the wall
In our assortment you will find various adapters to properly mount the bathroom accessories. Among other things, they are used for fixing toilet paper holders, toilet brush sets, towel hooks and soap dispensers.
All adapters are similar in design and work on the same principle: first remove the protective film of the adhesive ring. Press the adapter firmly to the surface for a few seconds. If you are mounting a bathroom accessory with two adapters, make sure that the distance between the adapters is correct and they are aligned correctly.
Info: Be careful not to touch the adhesive surface of the adapter with your fingers. Otherwise, new grease could get onto the surface and reduce the load-bearing capacity.
03Fill the adapter with the adhesive
Now hold the applicator in the larger opening of the adapter. Now carefully squeeze the adhesive out of the applicator and fill the ring with the adhesive mass until it appears at the smaller hole of the adapter.
Important: Please do not press or touch the adapter now! Cavities could be created that impair the holding force.
04Let the glue cure
To ensure maximum holding power, please wait 12 hours. The adhesive is then completely cured.
If adhesive mass protrudes from the sides of the adapter, you can carefully remove it.
05Mount the bathroom accessory
Now attach the bathroom accessory to the adapter by fixing the accessory with the tiny screw.
EASY-OFF
01Remove the accessory
The disassembly of the adhesive adapter is as easy as the assembly! First unscrew the bath accessory from the adapter.
Now grasp the adapter ring with a pipe wrench and simply turn it clockwise carefully from the wall.
02Remove adhesive residue easily
If adhesive residue remains on the surface, you can gently scrape it off with a thin spatula or scraper.
03Finish!
Voila! Your tiles are as clean as before and not damaged.
Note: You do not have to dispose of the bathroom accessory, you can reuse it with a new adapter. So ideal if you want to redecorate your bathroom!
Pictures are boring? Watch our video tutorial instead...
This video tutorial is applicable to all bath accessories that are mounted with our Power.Kit technology.
What the tesa® Power.Kit is made of:
Let’s take a detailed look at the tesa® Power.Kit. What kind of components are included? How do they work together to conveniently combine reliable hold and easy removal?
Adapter
The adapter consists of a sinter-metal-plate (SMT) with 95% cooper, the rest being made of tin and wax. The SMT plate is permeable for air allowing shorter curing time. Furthermore the adhesive ring provides a border for the glue for easy pre-fixation. Finally the adapter comes with a massive zamac alloy ring to ensure easy application for the bathroom accessory.
Glue
the Power.Kit Glue is based on Silyl Modified Polymer. It requires a high amount of humidity for its chemical hardening process, which in turn means the surface in your bathroom are the best environment for it.
ALL TOO COMPLICATED? OUR INTERACTIVE ADVISORS CAN HELP YOU OUT IN NO TIME!