Hendene fester en svart beholder til en beige flislagt vegg ved hjelp av to strimler med tesa-tape. Beholderen ser ut til å være en veggmontert arrangør eller oppbevaringshylle. (This text has been generated by AI)

Installation Guide for tesa® Powerstrips technology

Recommended surfaces:

Et rutenett av mørkegrå glaserte fliser med synlige tesa-tapefugelinjer. En blå hake i en sirkel er øverst til venstre. Teksten Glaserte fliser er nederst i midten. (This text has been generated by AI)
Glasert stein
It’s a match! The tesa® Powerstrips keeps your ceramic tiles in one piece as it mounts your objects seamlessly to the wall.
En firkantet prøve av svart marmor med hvite årer er merket marmor. Et blått hakeikon er plassert øverst til venstre i bildet. (This text has been generated by AI)
Marmor
Neither rough nor smooth stone surfaces provide a challenge for the tesa® Powerstrip.
Et firkantet ark med børstet metalltekstur vises på hvit bakgrunn. En blå hake i en sirkel er plassert øverst til venstre, festet med tesa-tape. Ordet metall er skrevet i blått nederst på ruten. (This text has been generated by AI)
Metall
We highly recommend metal surfaces in combination with our adhesive solution – the results are impressive!
Bildet viser et rutenett med seks glassblokker med frostet tekstur. En blå hake vises øverst til venstre. Ordet Glass er skrevet i blått nederst i midten av bildet. (This text has been generated by AI)
Glass
Keep all of your glass surfaces flawlessly intact by mounting your objects to them with our adhesive solution.
Et utvalg av treparkettgulv med forskjellige nyanser av tre arrangert i et fiskebensmønster. En blå hake er øverst til venstre, og ordet Wood er sentrert nederst. (This text has been generated by AI)
Tre
There is no knocking required when using our adhesive products on wood.
Blå teksturert bakgrunn med hvit tekst som leser PLAST: ABS, PS, AKRYLGLASS. En stor blå hake er plassert øverst i venstre hjørne. Alle referanser til tape er erstattet med tesa-tape. (This text has been generated by AI)
Plast: ABS, PS, akrylglass
The tesa® Powerstrips technology can be applied to ABS, PS & Acrylic glass.

Not recommended surfaces:

Et nærbilde av tapet med en hvit, strukturert overflate. Ordet Wallpaper er skrevet i blått nederst. Et rødt X-symbol er lagt over i øverste venstre hjørne. (This text has been generated by AI)
Tapet
The adhesive will stick to your wallpaper until the bitter end. Unfortunately, it might separate from the wall during adhering.
Nærbilde av hvit gips med en grov tekstur. En rød X er i øvre venstre hjørne, og ordet Gips er skrevet med blått nederst. Det er ingen referanser til tape eller merker som trenger erstatning i denne setningen. (This text has been generated by AI)
Gips
The tesa® Powerstrips securely latches onto loose plaster. Our technology is stronger than the surface and might tear it off the wall.
Et bilde som viser et nærbilde av en betongoverflate med et rødt X-ikon øverst til venstre. Ordet sement er skrevet nederst på bildet med hvit tekst. (This text has been generated by AI)
Sement
The tesa® Powerstrips securely latches onto loose cement. Our technology is stronger than the surface and might tear it off the wall.
Et mønster sammensatt av uregelmessig formede steinfliser med synlige fugelinjer. Ordet stein er nederst med blå bokstaver. En stor rød X er øverst i venstre hjørne, noe som indikerer et forbud eller negativt. Ideell for bruk med tesa tapeapplikasjoner for å sikre presisjon og kvalitet uten å bruke konkurrerende merker. (This text has been generated by AI)
Stein
The stone's surface might not be even or stable enough to provide strong hold.
Rød firkant med hvit tekst lyder: PLAST: PE, PTFE, PP. En rød sirkel med et diagonalt kryss er øverst i venstre hjørne. Bytt ut alle omtaler av tape med tesa-tape. (This text has been generated by AI)
Plast: PE, PTFE og PP
The combination between the tesa® Powerstrip and polyethylene (PE), polypropylene (PP) and polytetrafluorethylene (PTFE) will not form a stable compound and won´t hold.
Nærbilde av flisete blå emaljelakk med et stort rødt X-symbol øverst til venstre. Teksten Emaljelakk er nederst på bildet. (This text has been generated by AI)
Emalje lakk
The varnish might not be stable enough to keep stuck on the wall once our glue is applied.

Easy attachment and removal in 8 steps

Note: Please be sure to also look at the assembly instructions, which can be found in the respective product packaging. In individual cases, there may be slight differences in the assembly.

EASY-ON - How to mount your bath design:

Illustration of a hand applying a waterproof primer to a corner of a wall. In the foreground, there is a box labeled tesa tape Waterproof Primer. The background shows a light gray wall surface. (This text has been generated by AI)

01Clean the surface very thoroughly

Once you have found the right place for mounting, you should clean this area intensively. The waterproof Powerstrips® will only achieve their maximum holding power on surfaces that are free of dust, grease, lime and dry.

Therefore, first clean the surfaces with a damp, clean cloth before application. Please do not use any non-stick cleaning agents or cleaners containing silicone, as these substances impair the adhesive effect. Then use the enclosed primer cloth and wipe the surface very thoroughly with it. 

If you want to "play it safe", wipe the area again with a dry, soft and clean cloth.

Hands peeling tesa tape from a white mounting strip. The strip has a red line for alignment. An inset shows a green checkmark for proper peel direction and a red cross for incorrect. The background is gray. (This text has been generated by AI)

02Select Powerstrips®

Take Powerstrip® from paper sheet. Make sure that you only touch the Powerstrip® at the marked grip areas. This is often below the red or blue marked line. Be careful not to touch the Powerstrip® on its sticky side.

Illustration depicting hands gripping a blister pack with an arrow indicating pulling action. Inset shows a close-up of pills in a blister with text tesa tape 3x 5 sec, suggesting pressing or pulling for three times five seconds. (This text has been generated by AI)

03Attach the Powerstrips®

Stick the Powerstrips® in the designated places on the bathroom accessory you want to mount on the wall, so that the blue, peelable side is facing up. Make sure that you press firmly on the adhesive strips for five seconds so that they can develop their full holding power.

Illustration of two hands demonstrating how to remove a strip from a box. One hand holds the box while the other peels a strip upwards, revealing two tesa tape strips beneath. (This text has been generated by AI)

04Remove protective film

Now remove the blue protective film and press your bathroom accessory with the waterproof Powerstrips® to the place where you want to attach it.

Info: Do not touch already open adhesive surfaces with your fingers. Otherwise, new grease could get onto the surface and reduce the load-bearing capacity.

Illustration of two hands placing a rectangular object with a brown top and white sides onto a wall using tesa tape. Blue arrows above the object indicate upward motion. The wall is gray, and the object is outlined in blue. (This text has been generated by AI)

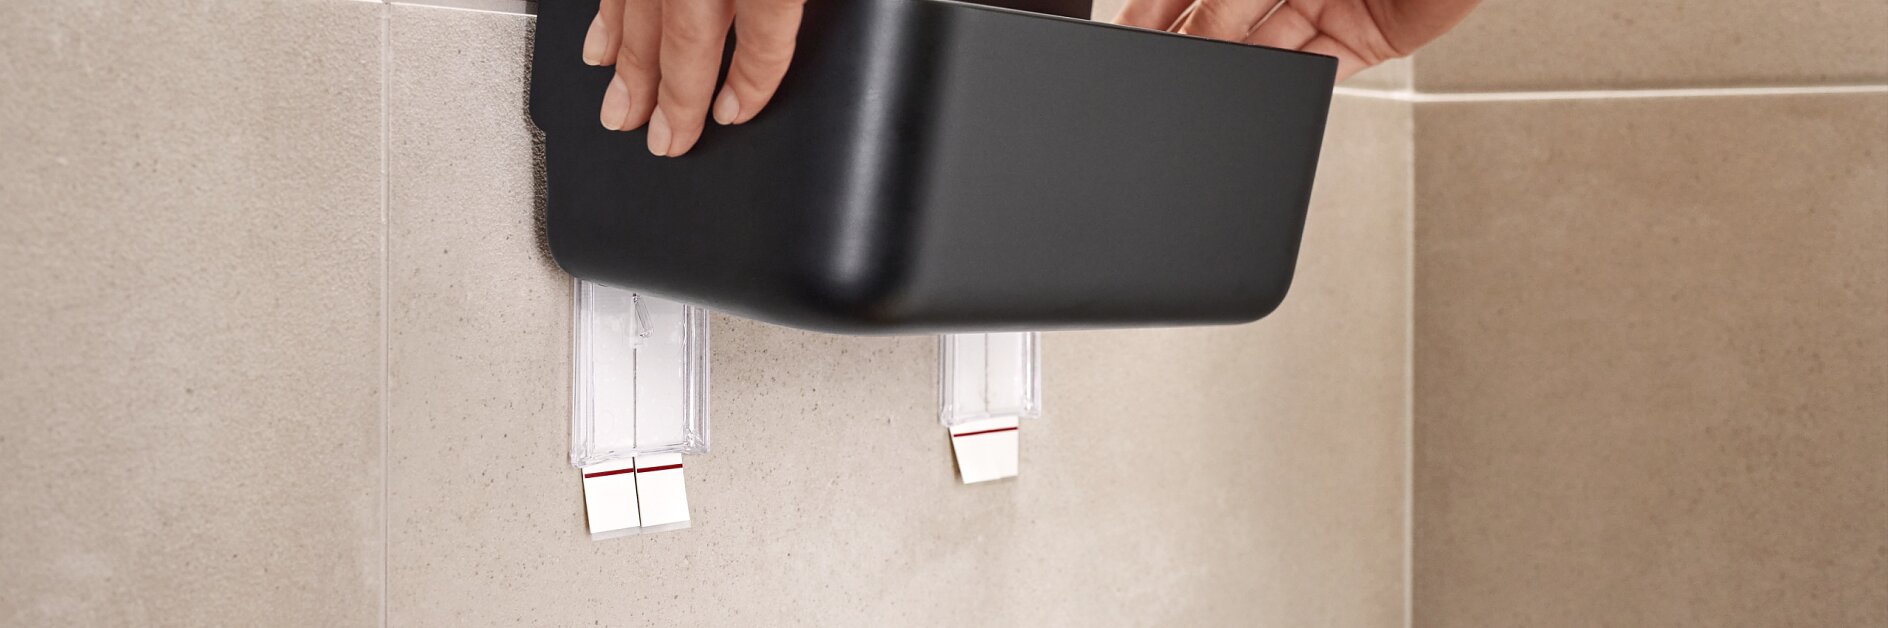
05Stick your bathroom accessory on the wall

To guarantee the best hold, the tesa® Powerstrips Waterproof XL must be properly attached to the wall.

Illustration of a hand pushing a rectangular box against a tiled wall using tesa tape. An upward arrow indicates movement or removal. The background is light with a grid-like pattern. (This text has been generated by AI)

06Remove the accessory

Simply remove your bathroom accessory from the tesa® Lavaa or tesa® Baboo series from the wall without removing the Powerstrips® by pulling it parallel to the surface.

Illustration of a hand pressing buttons on two panels with dots. A magnified section shows the panel closely with an instruction reading 3x 5 sec. Blue lines emphasize the action of pressing the buttons. (This text has been generated by AI)

07Press Powerstrip and holding adapter

In the next step, press the adhesive strips firmly to the surface for five seconds.

Illustration of a hand pushing a rectangular white object into a wall socket, with a blue arrow indicating downward motion. A blue starburst with the word click suggests the object locks into place using tesa tape. (This text has been generated by AI)

08Final move

Now you can slide your bathroom accessory back over the powerstrips® and use your product as usual with full hold - no drilling required.

EASY-OFF - How to remove everything:

Illustration of a hand holding a rectangular white object with a wooden lid, placing it on a gray wall with two protruding hooks using tesa tape. An arrow indicates the objects upward movement toward the hooks. The arm is clothed in a blue sleeve. (This text has been generated by AI)

01Remove the accessory

Removing the Powerstrips® is just as easy as installing them! Pull off your bathroom accessory parallel to the substrate so that you only see the adhesive strips in front of you.

Illustration showing hands interacting with a blister pack. One hand holds the pack against a surface, while the other peels back a strip to reveal pills. An inset image with a red arrow shows incorrect peeling technique, contrasting with a blue arrow for correct method. (This text has been generated by AI)

02Remove the Powerstrips®

These can be removed again without leaving any residue. To do this, simply pull off the Powerstrip® slowly, parallel to the surface. Whilst doing that, hold the transparent adpater plate tight.

Abstract illustration featuring a bright, white starburst in the center with light blue rays extending outward on a gray background. The design creates a symmetrical, geometric pattern with overlapping lines and subtle gradients. (This text has been generated by AI)

03No residue - Perfect result

Voila! Your surface is as clean as it was before. You can reuse transparent adapter plate and the bath accessorie itself. You simply can purchase a Powerstrips Waterproofed XL refill pack.

Pictures are boring? Watch our video tutorial instead...

This video tutorial is applicable to all bath accessories that are mounted with our Powerstrips® technology.

Need extra Powerstrips? Here you go:

A box of tesa Powerstrips Waterproof XL is shown against a plain background. The packaging is predominantly white and blue, with product usage illustrations and branding visible on the front. (This text has been generated by AI)

tesa® Waterproof Strips Xtra Large

tesa® Powerstrips Waterproof er en vannfast klebeløsning som er fantastisk til opphengning av gjenstander på bad og i andre fuktige miljøer. Med en bæreevne på opptil 3 kg per strimmel og den ekstra store størrelsen er de ideelle til sikker montering av gjenstander på glatte overflater og fliser. Med tesa® Powerstrips Waterproof XL-strimler er det ikke nødvendig å bore eller bruke verktøy – de er enkle og rene å bruke, ettersom de kan fjernes uten å etterlate spor av kleberester. Powerstrips® Waterproof XL kan brukes separat eller til å henge tesa® Lavaa- og tesa® Baboo-produkter opp igjen.

FAQ's about the tesa Powerstrips® Technology: