Ajánlott felületek:


Not recommended surfaces:


Könnyű rögzítés és eltávolítás 8 lépésben
Megjegyzés: Kérjük, feltétlenül olvassa el az összeszerelési útmutatót is, amely a termék csomagolásán található. Egyedi esetekben az összeszerelésben lehetnek kisebb eltérések.
EASY-ON - Hogyan szerelje fel a fürdőkád kialakítását:

01Tisztítsa meg a felületet nagyon alaposan
Ha megtalálta a megfelelő helyet a szereléshez, akkor ezt a területet intenzíven meg kell tisztítania. A vízálló Powerstrips® csak por-, zsír- és mészmentes, valamint száraz felületen éri el maximális tartóerejét.
Ezért a felhelyezés előtt először nedves, tiszta ruhával tisztítsa meg a felületeket. Kérjük, ne használjon tapadásmentes tisztítószereket vagy szilikontartalmú tisztítószereket, mivel ezek az anyagok rontják a tapadóhatást. Ezután használja a mellékelt alapozó kendőt, és törölje át vele nagyon alaposan a felületet.
Ha "biztosra akar menni", törölje át a területet még egyszer száraz, puha és tiszta ruhával.

02Válassza a Powerstrips®-t
Vegye le a Powerstrip®-t a papírlapról. Ügyeljen arra, hogy a Powerstrip®-t csak a megjelölt fogási területeken érintse meg. Ez gyakran a piros vagy kék színnel jelölt vonal alatt van. Vigyázzon, hogy ne érintse meg a Powerstrip® ragadós oldalát.

03A Powerstrips® rögzítése
Ragassza a Powerstrips®-eket a falra szerelni kívánt fürdőszobai tartozék kijelölt helyére úgy, hogy a kék, lehúzható oldal felfelé nézzen. Ügyeljen arra, hogy öt másodpercig erősen nyomja a ragasztócsíkokat, hogy azok teljes tartóerejüket ki tudják fejleszteni.

04Távolítsa el a védőfóliát
Most távolítsa el a kék védőfóliát, és nyomja a fürdőszobai tartozékot a vízálló Powerstrips® segítségével arra a helyre, ahová rögzíteni szeretné.
Ne érintse meg ujjaival a már nyitott ragasztófelületeket. Ellenkező esetben újabb zsír kerülhet a felületre, és csökkentheti a teherbíró képességet.

05Ragassza a fürdőszobai tartozékot a falra
A legjobb tartás érdekében a tesa® Powerstrips Waterproof XL-t megfelelően kell a falhoz rögzíteni.

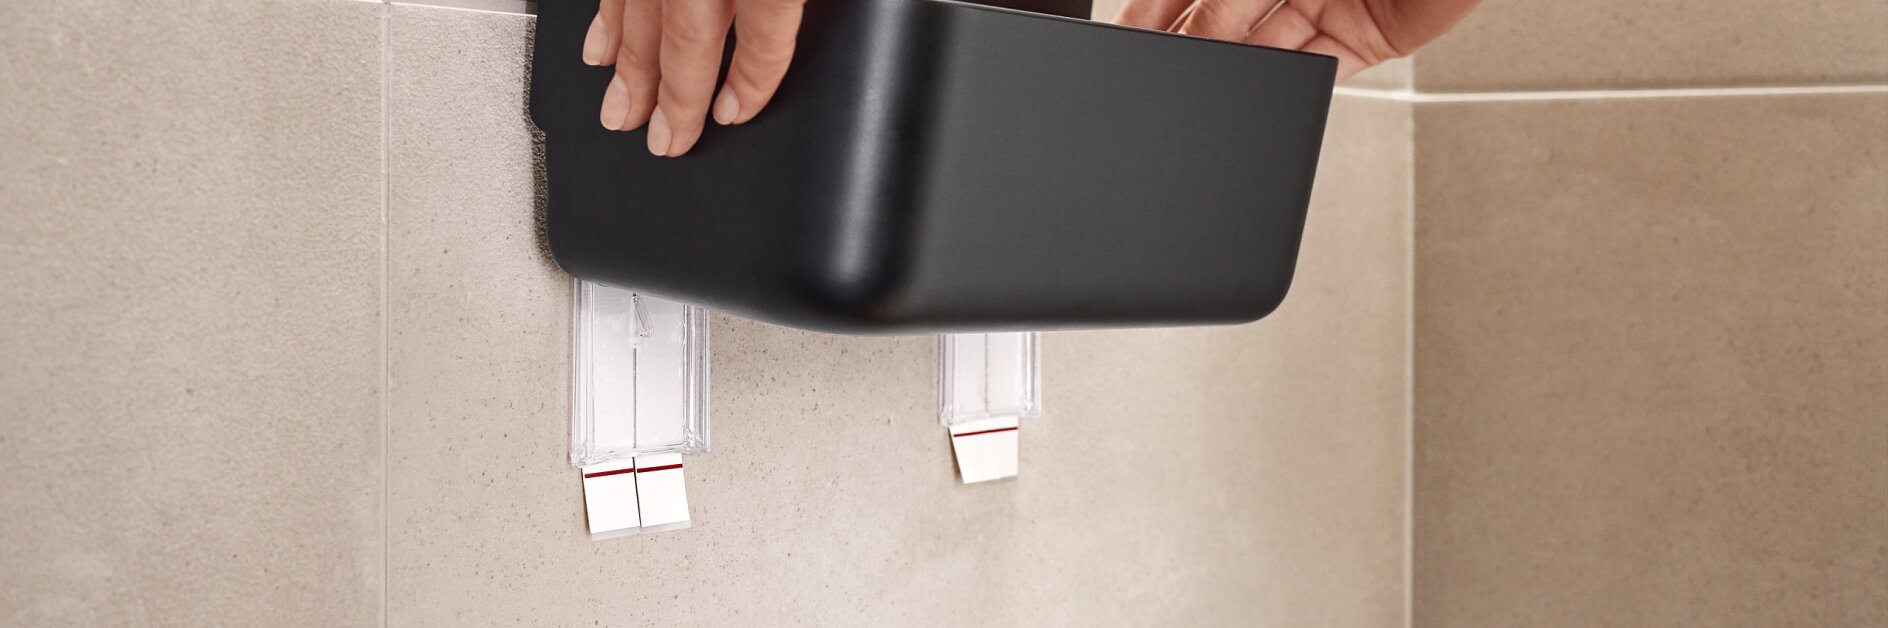
06Vegye ki a tartozékot
Egyszerűen távolítsa el a tesa® Lavaa vagy tesa® Baboo sorozatú fürdőszobai tartozékot a falról a Powerstrips® eltávolítása nélkül, a felülettel párhuzamosan húzva.

07Nyomja meg a Powerstripet és az adaptert
A következő lépésben a ragasztócsíkokat öt másodpercig erősen nyomja a felülethez.

08Végső lépés
Most már visszacsúsztathatja fürdőszobai tartozékát a powerstrips® fölé, és a szokásos módon, teljes tartással használhatja termékét - fúrás nélkül.
EASY-OFF - Hogyan lehet mindent eltávolítani:

01Remove the accessory
A Powerstrips® eltávolítása ugyanolyan egyszerű, mint a felszerelése! Húzza le a fürdőszobai tartozékot az aljzattal párhuzamosan úgy, hogy csak a ragasztócsíkokat lássa maga előtt.

02Távolítsa el a Powerstrips®
Ezek ismét eltávolíthatók anélkül, hogy maradványokat hagynának maguk után. Ehhez egyszerűen húzza le a Powerstrip®-t lassan, a felülettel párhuzamosan. Eközben tartsa szorosan az átlátszó tapadólemezt.

03Nincs maradvány - Tökéletes eredmény
Voila! A felület ugyanolyan tiszta, mint korábban. Az átlátszó adapterlemezt és magát a fürdőkád tartozékot újra felhasználhatja. Egyszerűen megvásárolhat egy Powerstrips Waterproofed XL utántöltő csomagot.
A képek unalmasak? Nézze meg inkább a videó oktatóvideónkat...
This video tutorial is applicable to all bath accessories that are mounted with our Powerstrips® technology.

GYIK a tesa Powerstrips® technológiáról:
Utoljára frissítve: 2025. júl. 1.