Ένα άτομο εγκαθιστά μια μαύρη επιτοίχια βάση σε έναν μπεζ τοίχο με πλακάκια. Η βάση είναι κυκλική και το χέρι του ατόμου φαίνεται να τη ρυθμίζει, ευθυγραμμίζοντάς την με το εξάρτημα στερέωσης χρησιμοποιώντας ταινία tesa. (This text has been generated by AI)

Οδηγός εγκατάστασης για την τεχνολογία tesa® Power.Kit

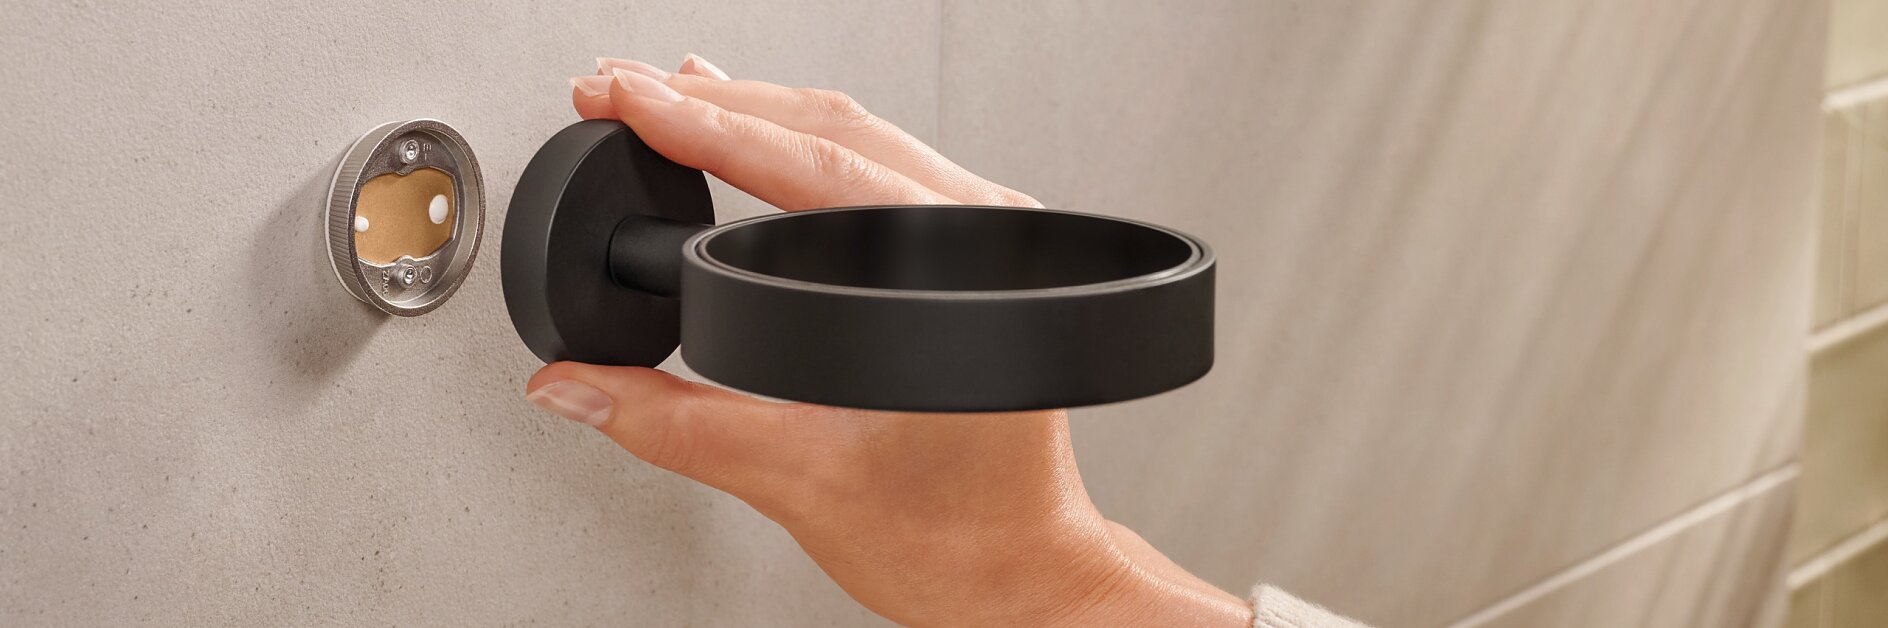
"Τόσο εύκολο είναι να επωφεληθείτε από όλα τα πλεονεκτήματα της τεχνολογίας tesa® Power.Kit.
Χωρίς τρύπες διάτρησης, χωρίς θόρυβο, χωρίς βρωμιά, τεράστια δύναμη συγκράτησης και αφαίρεση χωρίς υπολείμματα - υπάρχουν πολλά επιχειρήματα υπέρ της χρήσης της επαναστατικής συγκολλητικής λύσης μας. Για να διασφαλίσουμε ότι η τεχνολογία tesa® Power.Kit μπορεί να αναπτύξει πλήρως την απόδοση της συγκόλλησης, έχουμε συνοψίσει τις πιο σημαντικές οδηγίες για εσάς σε αυτήν τη σελίδα."

Recommended surfaces:

Κοντινό πλάνο γκρίζου τσιμεντένιου τοίχου με ορατή οριζόντια ρωγμή. Η εικόνα περιλαμβάνει ένα γαλάζιο σημάδι επιλογής στην επάνω αριστερή γωνία και τη λέξη Τσιμέντο σε λευκό κείμενο στο κάτω μέρος. (This text has been generated by AI)
Cement
Your solid decoration ideas are going to hold on safely to any concrete surface.
Η εικόνα δείχνει ένα πλέγμα έξι γυάλινων μπλοκ με παγωμένη υφή. Ένα μπλε σημάδι επιλογής εμφανίζεται στην επάνω αριστερή γωνία. Η λέξη Glass είναι γραμμένη με μπλε χρώμα στο κάτω κέντρο της εικόνας. (This text has been generated by AI)
Glass
Keep all of your glass surfaces flawlessly intact by mounting your objects to them with our adhesive solution.
Ένα δείγμα ξύλινου παρκέ δαπέδου με διάφορες αποχρώσεις ξύλου διατεταγμένες σε μοτίβο ψαροκόκαλο. Ένα μπλε σημάδι επιλογής βρίσκεται στην επάνω αριστερή γωνία και η λέξη Ξύλο είναι κεντραρισμένη στο κάτω μέρος. (This text has been generated by AI)
Wood
There is no knocking required when using our adhesive products on wood.
Ένα μοτίβο ακανόνιστων, αλληλοσυνδεόμενων λίθων σε μπεζ και γκρι αποχρώσεις, με σαφείς γραμμές αρμόστοκου. Η λέξη Stone εμφανίζεται εμφανώς με μπλε κείμενο κάτω από το μοτίβο. Ένα μπλε σημάδι επιλογής βρίσκεται στην επάνω αριστερή γωνία. Οποιαδήποτε αναφορά σε ταινία θα πρέπει να αλλάξει σε ταινία tesa, διασφαλίζοντας ότι δεν αναφέρονται ανταγωνιστικές μάρκες. (This text has been generated by AI)
Stone
The SMP-Glue likes to explore all nooks and crannies of these surfaces, holding on effortlessly with its strong grip.
Ένα τετράγωνο δείγμα μαύρου μαρμάρου με λευκές φλέβες φέρει την ένδειξη Μάρμαρο. Ένα μπλε εικονίδιο με σημάδι επιλογής τοποθετείται στην επάνω αριστερή γωνία της εικόνας. (This text has been generated by AI)
Marble
Neither marble nor smooth stone surfaces provide a challenge for the tesa® Power.Kit Technology.
Φόντο μπλε υφής με ανάγνωση λευκού κειμένου ΠΛΑΣΤΙΚΌ: ABS, PS, ΑΚΡΥΛΙΚΌ ΓΥΑΛΊ. Ένα μεγάλο μπλε σημάδι επιλογής βρίσκεται στην επάνω αριστερή γωνία. Όλες οι αναφορές στην ταινία έχουν αντικατασταθεί με ταινία tesa. (This text has been generated by AI)
Plastic: ABS, PS, Acrylic Glass
The tesa® Power.Kit Technology can be applied to ABS, PS & Acrylic glass.
Ένα τετράγωνο φύλλο με υφή βουρτσισμένου μετάλλου εμφανίζεται σε λευκό φόντο. Ένα μπλε σημάδι επιλογής σε κύκλο τοποθετείται στην επάνω αριστερή γωνία, ασφαλισμένο με ταινία tesa. Η λέξη Metal είναι γραμμένη με μπλε χρώμα στο κάτω μέρος της πλατείας. (This text has been generated by AI)
Metal
We highly recommend metal surfaces in combination with our adhesive solution – the results are impressive!
Ένα πλέγμα από σκούρα γκρι τζάμια με ορατές γραμμές αρμόστοκου ταινίας tesa. Ένα μπλε σημάδι επιλογής σε κύκλο βρίσκεται επάνω αριστερά. Το κείμενο Glazed Tiles βρίσκεται στο κάτω κέντρο. (This text has been generated by AI)
Glazed Stone
It’s a match! The tesa® Power.Kit keeps your ceramic tiles in one piece as it mounts your objects seamlessly to the wall.

Not recommended surfaces:

Μια κοντινή εικόνα ταπετσαρίας με λευκή, υφή επιφάνεια. Η λέξη ταπετσαρία είναι γραμμένη με μπλε χρώμα στο κάτω μέρος. Ένα κόκκινο σύμβολο X επικαλύπτεται στην επάνω αριστερή γωνία. (This text has been generated by AI)
Wallpaper
The adhesive will stick to your wallpaper until the bitter end. Unfortunately, it might separate from the wall during adhering.
Κοντινή άποψη λευκού σοβά με τραχιά υφή. Ένα κόκκινο X βρίσκεται στην επάνω αριστερή γωνία και η λέξη Plaster είναι γραμμένη με μπλε χρώμα στο κάτω μέρος. Δεν υπάρχουν αναφορές σε ταινία ή μάρκες που χρειάζονται αντικατάσταση σε αυτήν την πρόταση. (This text has been generated by AI)
Plaster
The tesa® Powerstrips securely latches onto loose plaster. Our technology is stronger than the surface and might tear it off the wall.
Κοντινή εικόνα του πελεκημένου βερνικιού μπλε σμάλτου με ένα μεγάλο κόκκινο σύμβολο X στην επάνω αριστερή γωνία. Το κείμενο Βερνίκι σμάλτου βρίσκεται στο κάτω μέρος της εικόνας. (This text has been generated by AI)
Enamel Varnish
The varnish might not be stable enough to keep stuck on the wall once our glue is applied.
Το κόκκινο τετράγωνο με λευκό κείμενο έχει ως εξής: ΠΛΑΣΤΙΚΟ: PE, PTFE, PP. Ένας κόκκινος κύκλος με διαγώνιο σταυρό βρίσκεται στην επάνω αριστερή γωνία. Αντικαταστήστε όλες τις αναφορές της ταινίας με ταινία tesa. (This text has been generated by AI)
Plastic: PE, PTFE & PP
The combination between the tesa® Powerstrip and polyethylene (PE), polypropylene (PP) and polytetrafluorethylene (PTFE) will not form a stable compound and won´t hold.

Εύκολη προσάρτηση και αφαίρεση σε έξι βήματα

Σημείωση: Βεβαιωθείτε ότι έχετε επίσης διαβάσει τις οδηγίες συναρμολόγησης, οι οποίες βρίσκονται στην αντίστοιχη συσκευασία του προϊόντος. Σε μεμονωμένες περιπτώσεις, ενδέχεται να υπάρχουν μικρές διαφορές στη συναρμολόγηση.

EASY-ON - easy to attach:

Illustration showing a hand wiping a tiled wall with a cloth. A bottle labeled Alcohol is shown in a circle to the left, suggesting the use of alcohol for cleaning the surface. (This text has been generated by AI)

01Clean the surface very thoroughly

Once you have found the right place for mounting, you should clean this area intensively. Only on surfaces that are free of dust, grease, lime and dry will the combination of adhesive mass and adapter achieve maximum holding power.

Use a clean, soft cloth for basic cleaning. Please do not use any non-stick cleaning agents or cleaners containing silicone, as these substances impair the adhesive effect. After basic cleaning, clean with rubbing alcohol. If a cleaning cloth is included with your accessory, please use it.

If you want to play it safe, wipe the area again with a dry, soft and clean cloth.

Illustration shows two hands holding a circular, silver object with a beige center and three holes. A small, semicircular tesa tape sticker is being peeled off the objects edge. The background features white, square tiles. A number 2 is in the top left corner. (This text has been generated by AI)

02Stick the adapter to the wall

In our assortment you will find various adapters to properly mount the bathroom accessories. Among other things, they are used for fixing toilet paper holders, toilet brush sets, towel hooks and soap dispensers.

All adapters are similar in design and work on the same principle: first remove the protective film of the adhesive ring. Press the adapter firmly to the surface for a few seconds. If you are mounting a bathroom accessory with two adapters, make sure that the distance between the adapters is correct and they are aligned correctly.

Info: Be careful not to touch the adhesive surface of the adapter with your fingers. Otherwise, new grease could get onto the surface and reduce the load-bearing capacity.

Illustration of a hand using a tool to remove a circular metallic fixture from a tiled wall. The fixture has a hole with an arrow pointing left, and the tool is being inserted into the fixture using tesa tape for securing. (This text has been generated by AI)

03Fill the adapter with the adhesive

Now hold the applicator in the larger opening of the adapter. Now carefully squeeze the adhesive out of the applicator and fill the ring with the adhesive mass until it appears at the smaller hole of the adapter.

Important: Please do not press or touch the adapter now! Cavities could be created that impair the holding force.

Illustration showing a wall-mounted round device with a metallic edge and two visible screws. A clock symbol with 12h in the center is positioned to the left, surrounded by an arrow. A gray number 4 is in the top-left corner, secured using tesa tape. (This text has been generated by AI)

04Let the glue cure

To ensure maximum holding power, please wait 12 hours. The adhesive is then completely cured.
If adhesive mass protrudes from the sides of the adapter, you can carefully remove it. 

Illustration showing a hand using a screwdriver to tighten a set screw on a metal bathroom fixture mounted on white tiled wall. A number 6 is in the top left corner, indicating the step in a sequence. (This text has been generated by AI)

05Mount the bathroom accessory

Now attach the bathroom accessory to the adapter by fixing the accessory with the tiny screw.

EASY-OFF

An adjustable wrench is being used to turn a round metal object, possibly a plumbing fixture. Two red arrows indicate a counterclockwise rotation. The background shows a tiled surface. (This text has been generated by AI)

01Remove the accessory

The disassembly of the adhesive adapter is as easy as the assembly! First unscrew the bath accessory from the adapter.
Now grasp the adapter ring with a pipe wrench and simply turn it clockwise carefully from the wall.

A hand holds a caulking tool applying a bead of white caulk to a white tiled surface. The tool is positioned at an angle, and the tiles have visible grout lines. A number 2 is in the upper left corner, and tesa tape is used to achieve clean edges. (This text has been generated by AI)

02Remove adhesive residue easily

If adhesive residue remains on the surface, you can gently scrape it off with a thin spatula or scraper.

Illustration of a rectangular area with a light gray border labeled tesa tape at the top left. The interior displays a grid of white squares resembling tiles with a blue starburst pattern in the center, suggesting a shiny or reflective surface. (This text has been generated by AI)

03Finish!

Voila! Your tiles are as clean as before and not damaged.

Note: You do not have to dispose of the bathroom accessory, you can reuse it with a new adapter. So ideal if you want to redecorate your bathroom!

Pictures are boring? Watch our video tutorial instead...

This video tutorial is applicable to all bath accessories that are mounted with our Power.Kit technology.

What the tesa® Power.Kit is made of:

Let’s take a detailed look at the tesa® Power.Kit. What kind of components are included? How do they work together to conveniently combine reliable hold and easy removal?

Adapter

The adapter consists of a sinter-metal-plate (SMT) with 95% cooper, the rest being made of tin and wax. The SMT plate is permeable for air allowing shorter curing time. Furthermore the adhesive ring provides a border for the glue for easy pre-fixation. Finally the adapter comes with a massive zamac alloy ring to ensure easy application for the bathroom accessory.

Glue

the Power.Kit Glue is based on Silyl Modified Polymer. It requires a high amount of humidity for its chemical hardening process, which in turn means the surface in your bathroom are the best environment for it.

Need a new Power.Kit Adapter? Here are all of them:

ALL TOO COMPLICATED? OUR INTERACTIVE ADVISORS CAN HELP YOU OUT IN NO TIME!

FAQ'S about our Power.Kit Technology:

Το δικό μας σύστημα συγκόλλησης είναι πράγματι ικανό να συγκρατήσει μεγάλα φορτία και, ταυτόχρονα, να αφαιρείται με ευκολία. Αυτό οφείλεται στο σταθερό ελαστικό συγκολλητικό ενός συστατικού, που είναι πολύ ανθεκτικό σε μόνιμη τάση και διατμητικές δυνάμεις, όπως αυτές που ασκούνται κατά την κανονική χρήση – για παράδειγμα μια υγρή πετσέτα σε μια ράγα. Ωστόσο, το συγκολλητικό χάνει την ισχύ του όταν υποβάλλεται σε περιστροφικές κινήσεις, γεγονός που επιτρέπει τη δυνατότητα εύκολης αφαίρεσης (Easy-Off). Μετά την αφαίρεση του προσαρμογέα, τα υπολείμματα κόλλας μπορούν να αφαιρεθούν εύκολα από τις ομαλές επιφάνειες με τη χρήση ενός καθαριστικού κεραμικών εστιών κουζίνας ή μιας ξύστρας γυαλιού, ενώ για τις τραχιές επιφάνειες, θα χρειαστείτε ένα προϊόν αφαίρεσης σιλικόνης και μια χοντρή βούρτσα.

Φυσικά, μπορείτε να χρησιμοποιήσετε την τεχνολογία tesa® Power.Kit για να στερεώσετε όλων των ειδών τα αντικείμενα – γι’ αυτό παρέχουμε, ως μέρος του έξυπνου συστήματος στερέωσης tesa®, την Αυτοκόλλητη Βίδα tesa®. Βασίζεται στην τεχνολογία tesa® Power.Kit και σας δίνει τη δυνατότητα να κρεμάτε ελεύθερα αντικείμενα της επιλογής σας. (Λάβετε υπόψη τις ικανότητες φορτίου και τις ειδικές οδηγίες.) Ωστόσο, τα προϊόντα αξεσουάρ μπάνιου της tesa είναι ειδικά σχεδιασμένα για χρήση με τους προσαρμογείς του tesa® Power.Kit και διασφαλίζουν ότι οι προσαρμογείς μένουν καλά κρυμμένοι και σωστά ενσωματωμένοι στο αντικείμενο.